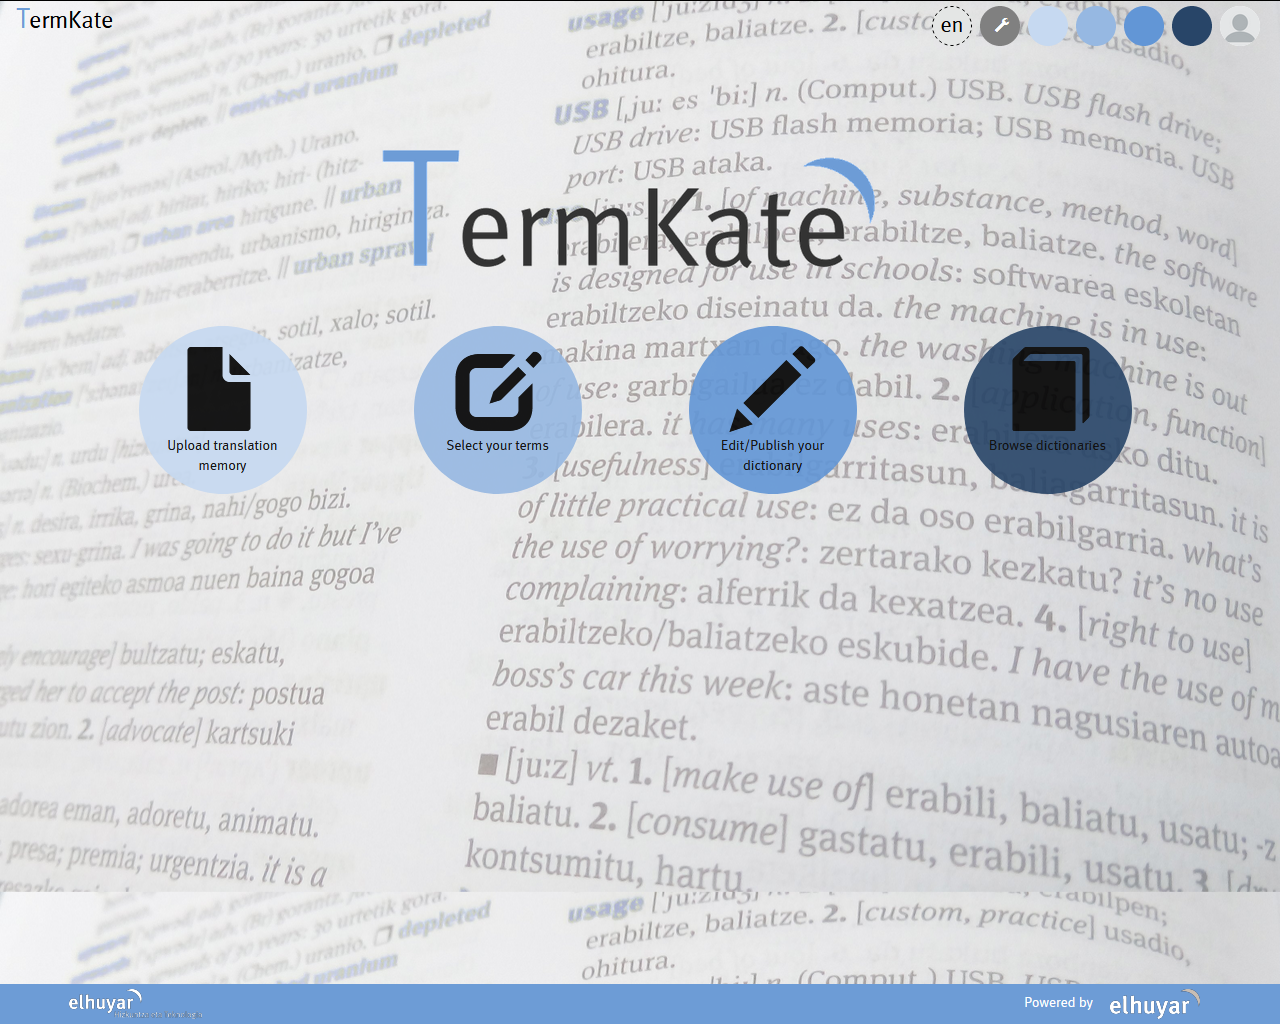
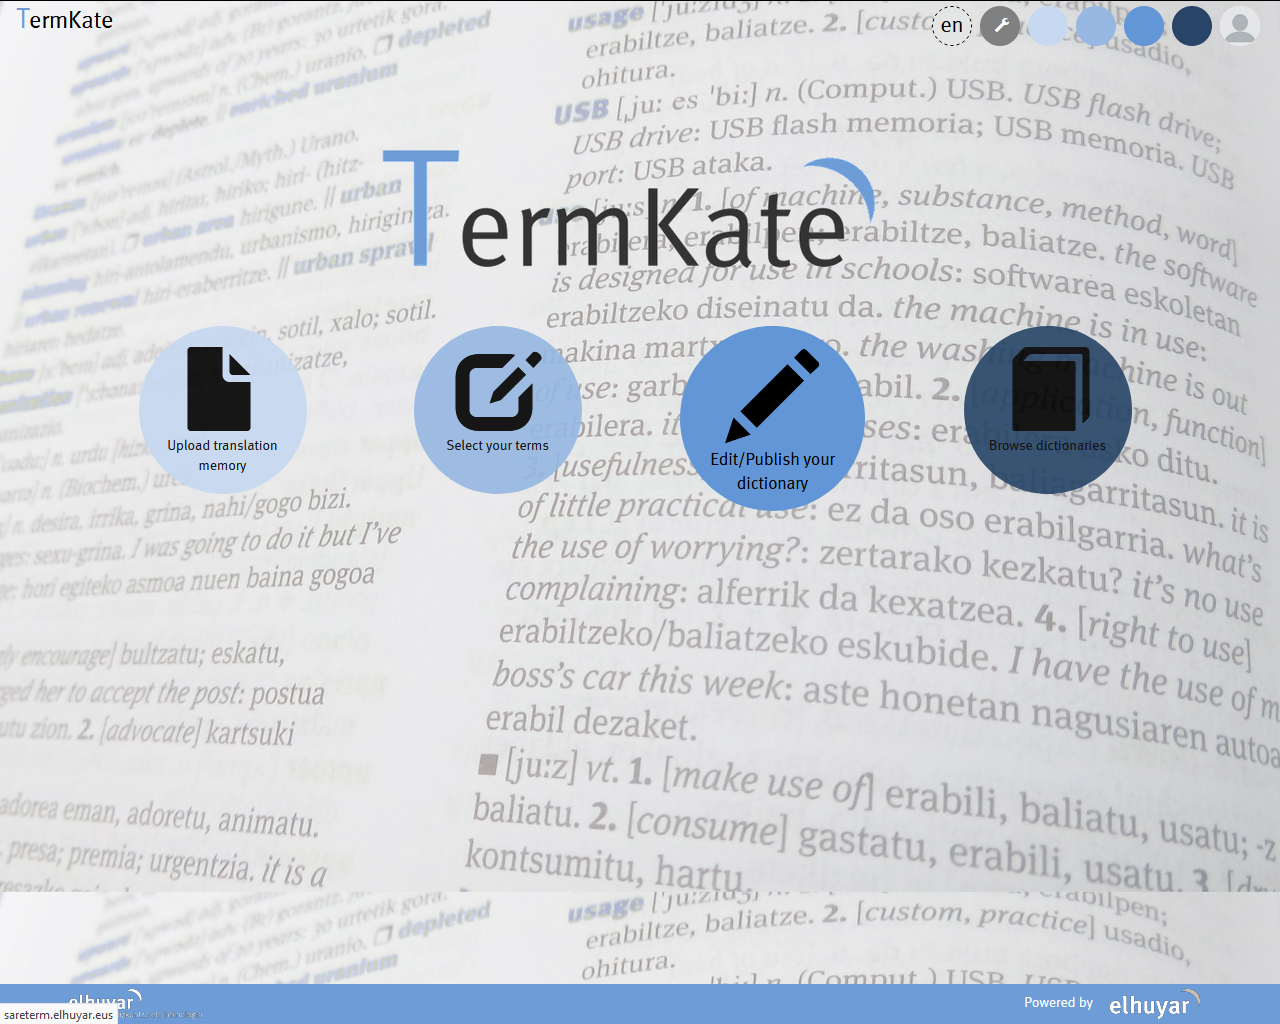
1. ERREGISTRATU/IZENA EMAN
2. ITZULPEN-MEMORIA IGO
3. TERMINOAK HAUTATU
4. HIZTEGIA BERRIA SORTU
5. AURRETIK SORTUA DAGOEN HIZTEGI BAT EGUNERATU
6. DATU-BASE TERMINOLOGIKOA LANDU
7. HIZTEGIA KONTSULTATU
8. HIZTEGIAREN KONFIGURAZIOA
1. ERREGISTRATU/IZENA EMAN
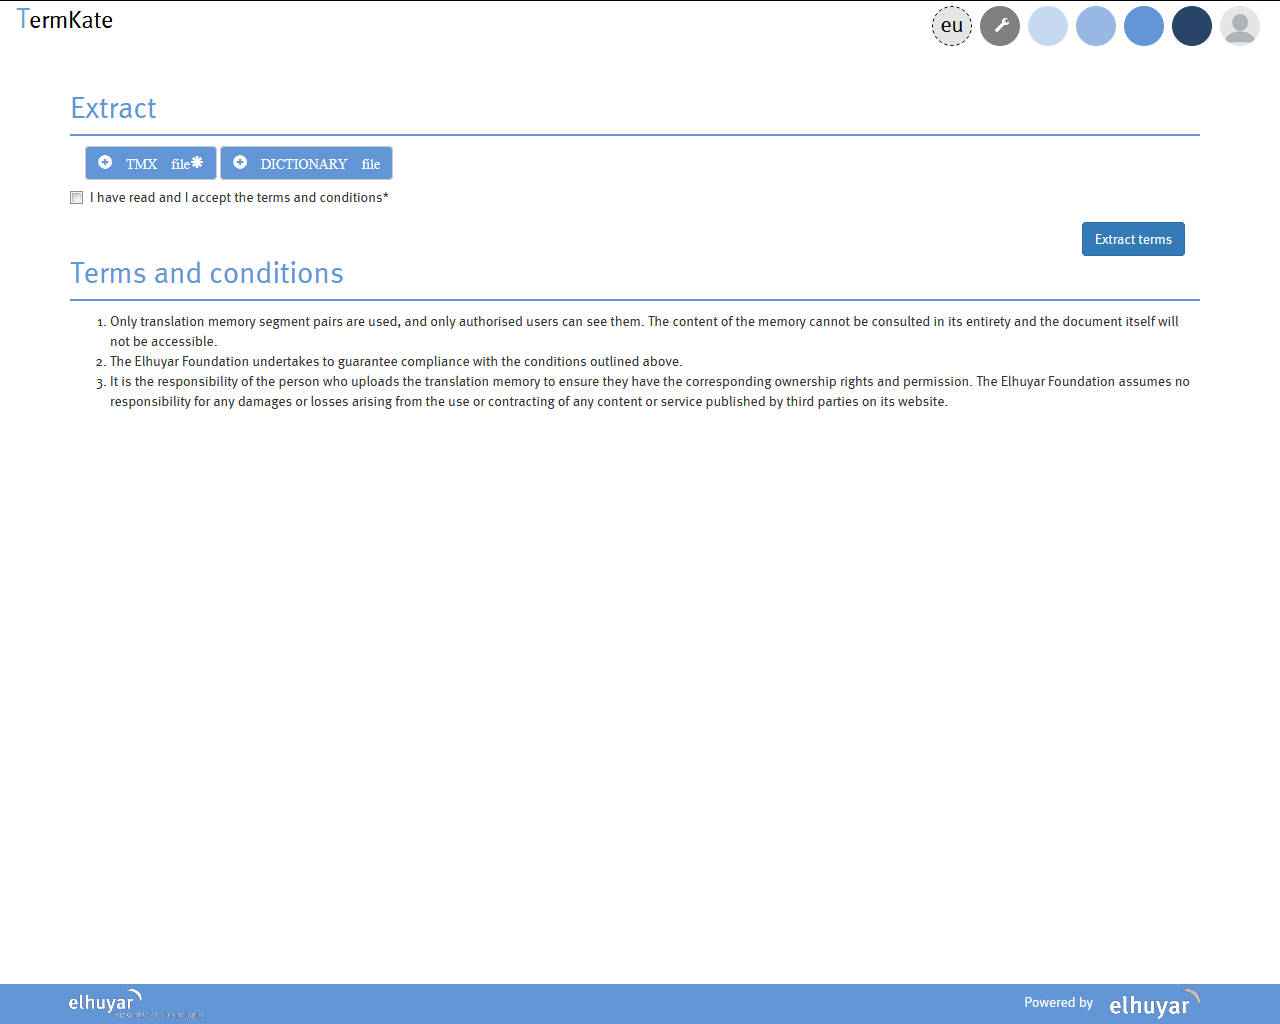
2. ITZULPEN-MEMORIA IGO
Itzulpen-memoria igo (Uploada translatio memory) botoia sakatu: TMX igo, baldintzak onartu eta terminoak erauzi botoiari eman.
Nahi izanez gero, itzulpen-memoriarekin batera hiztegi bat igotzeko aukera egongo da nahi dugun erauzketako termino-bikoteak parekatzeko. Hiztegi hau bi zutabeko testu fitxategi bat izan behar du, UTF-8 karaktere-kodeketan. Lehengo zutabean jatorrizko hizkuntzako sarrerak eta bigarrenean helburuko hizkuntzakoak dituena eta bi zutabeak tabuladoreaz bereizita dituena.
3. TERMINOAK HAUTATU
Terminoak hautatu (Select your terms) botoia sakatu eta bertako erauzketen artean, landu nahi duguna aukeratu.
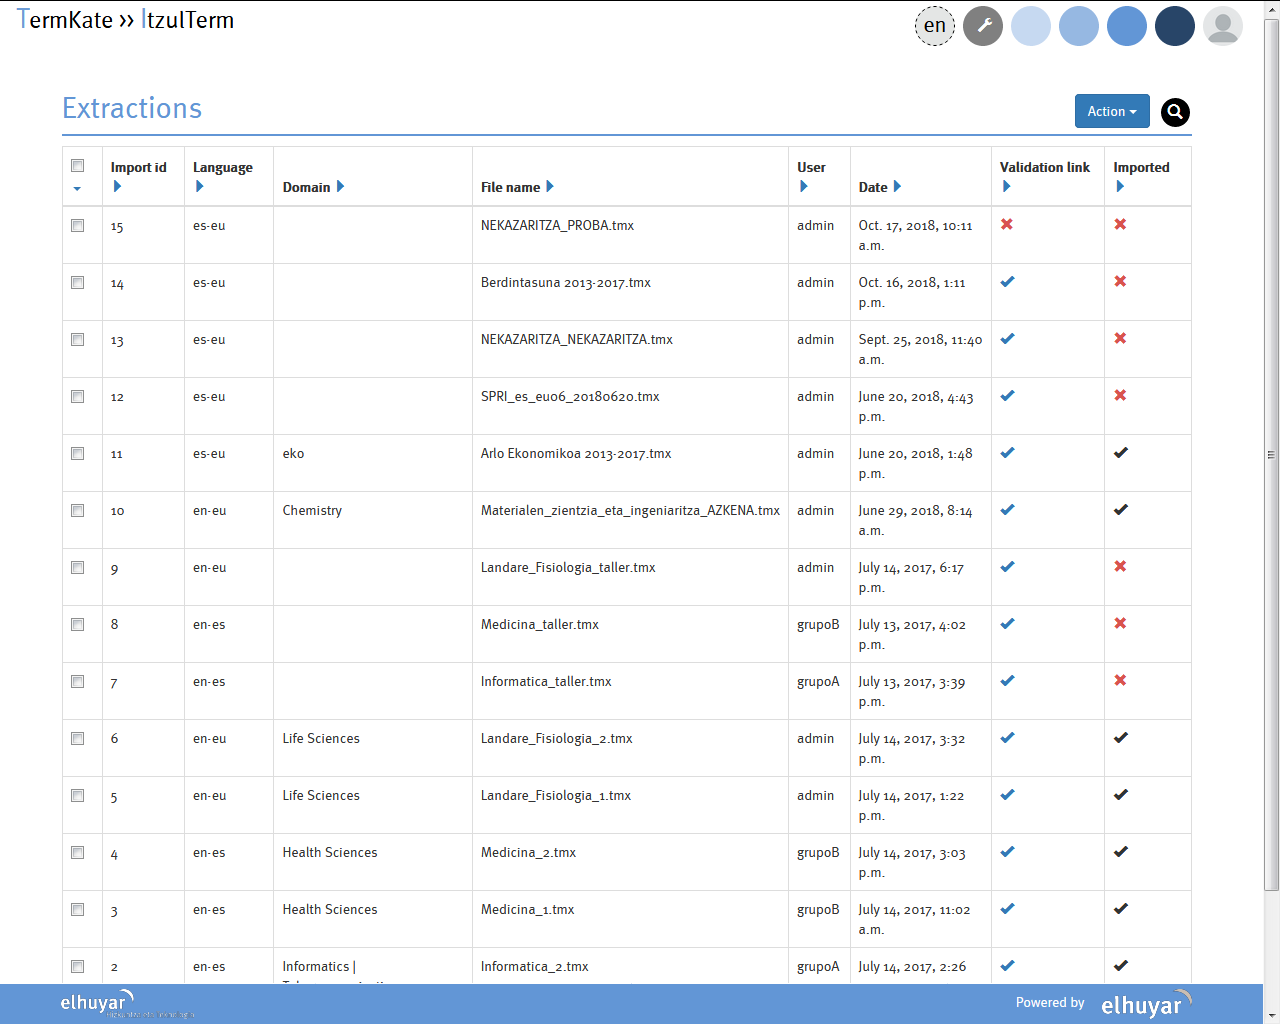
Behin erauzketa aukeratuta, itzulpen-memoriatik erauzitako termino-bikote hautagaiak lantzen hasiko gara. Horretarako Itzulterm izeneko ingurunean egingo dugu lan.

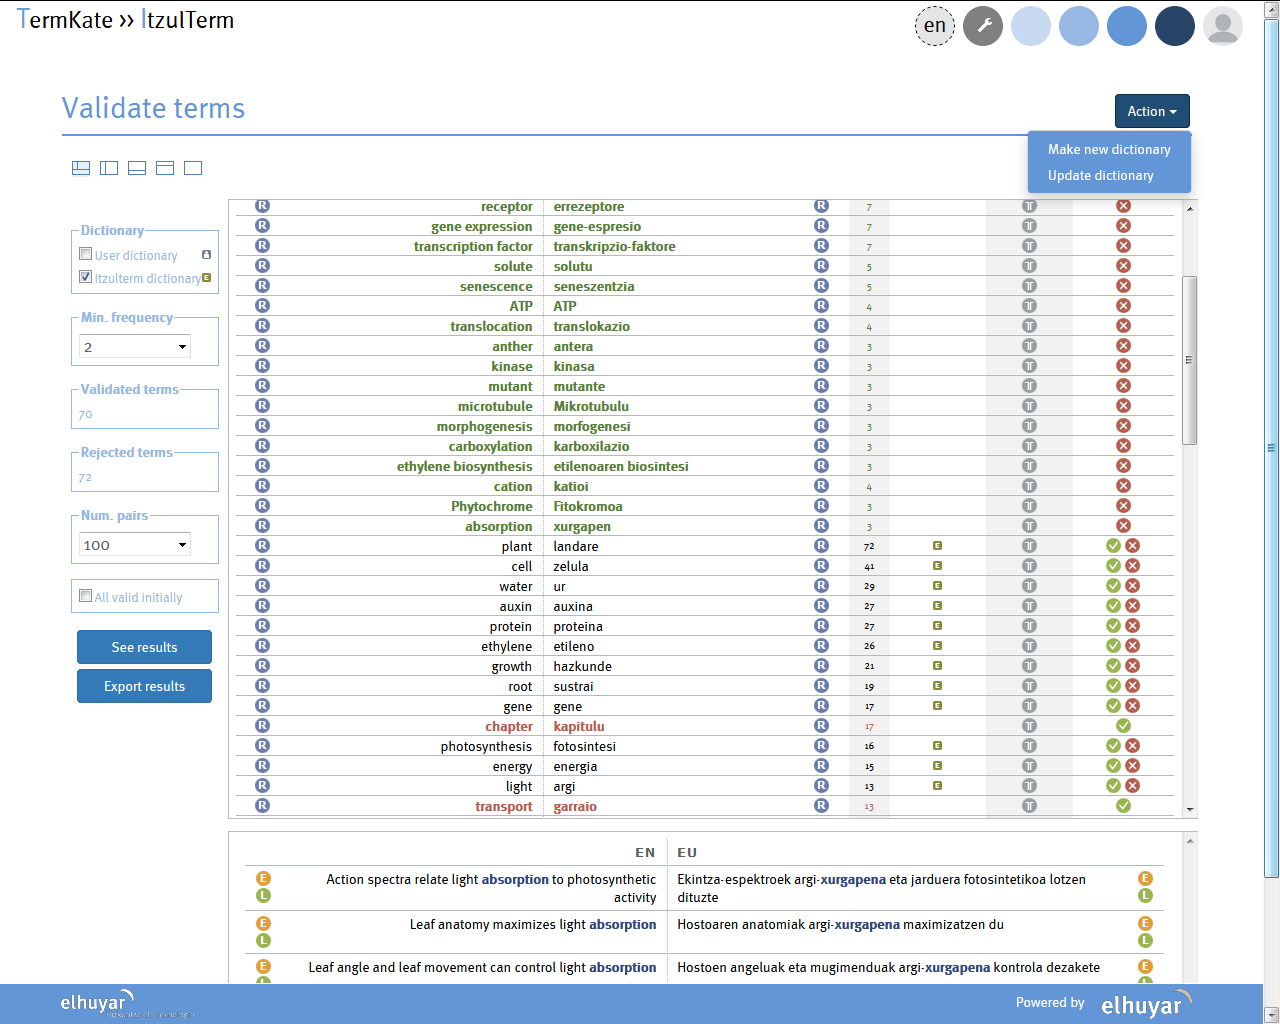
Zer erakusten digu Itzultermek
Termino baliokidetzat jo dituen jatorri hizkuntzako eta helburu hizkuntzako bikoteak taula batean bistaratzen ditu, hautatze-algoritmoak termino baliokideak direla esateko duen 'segurtasunaren' edo 'fidagarritasunaren' arabera ordenatuta. Horrez gain, termino-bikotearen maiztasuna ere agertzen da (F zutabea).
Emaitzak bistaratzeko, 'Emaitzak ikusi' (See results) botoia sakatu behar da. Hori egiterakoan, erabiltzaileak zenbait aukera ditu:
- Termino-bikoteek itzulpen-memorian duen maiztasun minimoa (Min. Frequency): 0, 1, 2, 5, 10, 15...
- Hautagai-kopurua zehaztu (Num. Pairs): 100, 1.000, 2.000...
- Hiztegietan aurkituetako terminoak taulan bistaratu ala ez:
- User dictionary: erabiltzaileak eskura duen edo lehendik egindako erauzketa batzuetatik esportatutako hitzez osatua den hiztegia bidaltzeko aukera du TMX memoriarekin batera. Orain, erauzketa amaitutakoan, lehendik hiztegian dauden eta berriz erauzi diren termino-bikoteak taulan agertzeko edo ez agertzeko aukera dauka (egin nahi duen lanketa-motaren arabera)
- Itzulterm dictionary: ELexBIk erauzitako terminoak Elhuyarren datu-base orokorrean dagoen jakin nahi badu, aukera hau aktibatu egin behar da. Informazio hori interesgarria izan daiteke termino-bikotea baliozkotzat jotzerakoan
- Hiztegietan aurkitu diren bikoteak ranking-aren hasieran ordenatzen dira, eta DICT., zutabean zehazten da, ikonoen bidez, zein hiztegitan aurkitu diren.
- All valid initially: erauzketa automatikoaren emaitzen taulen proposatutako termino-bikote guztiak baliozkotzat jotzea, hurrengo urrats batean egokiak ez direnak baztertzeko. Askotan, lan gutxiago izaten da bikote egoki ez direnak markatzea egokiak direnak markatzea baino
Nola erabili Itzulterm
Taula horretako botoi batzuen bidez, erabiltzaileak hainbat aukera ditu emaitza lantzeko, eta horretaz baliatzeko:
- TEXT column: When clicking on the button
 , the contexts of the corresponding candidate pair can be displayed.
 - EVAL. column: to validate (
 ) or reject (
 ) the corresponding term pair. If a term pair is validated, the terms appear highlighted in green; when rejected, they appear in red.
 - The button beside each term
 : to have the ranking of the equivalents of the term candidate displayed; the system also provides the option of validating a candidate that is not the first one in the ranking (as in the EVAL.: column).
- Testuinguruen leihoan beste botoi batzuk daude itzulpen-memoriaren segmentuen hizkuntza bakoitzeko unitateetan. Horien funtzioa da erauzketa automatikoa hobetzea, hau da, osorik erauzi ez den termino bat erauztea, edo erauzitako hautagai baten barnean terminoa badago, hori erauztea... Honela erabiltzen dira:
 botoia: unitate horretatik erauzi den terminoa aldatzeko aukera. Erauzi nahi den sintagma hautatu, 'Canonical form' laukian forma mugagabea idatzi, eta save botoia sakatzea besterik ez da egin behar.
 botoia: segmentu bereko beste hizkuntzako unitatetik, botoia sakatu eta aurreko urratsean erauzi dugun termino berria ageriko da zerrendaren amaieran; botoi berdea sakatu, eta bikotea baliozkotzat jo dugu.
Hiztegiratu nahi ditugun termino-bikoteak balidatu ondoren, hainbat ekintza egiteko aukera izango dugu:
- CSV fitxategi bat sortu: 'Export results' botoia sakatuta, erabiltzaileak baliozkotzat jo dituen termino-bikote guztiak eta horien maiztasunak esportatzen ditu ItzulTerm-ek .csv fitxategi batera. Fitxategi hau hurrengo erauzketarako baliagarria izan daiteke eta hiztegi bezala igo dezakegu itzulpen-memoriarekin batera.
- Hiztegi berri bat sortu: 'Make new dictionary' botoia sakatuta 'Action' ikonoaren barruan
- Aurretik dagoen hiztegi bat eguneratu/elikatu: 'Update dictionary' botoia sakatuta 'Action' ikonoaren barruan
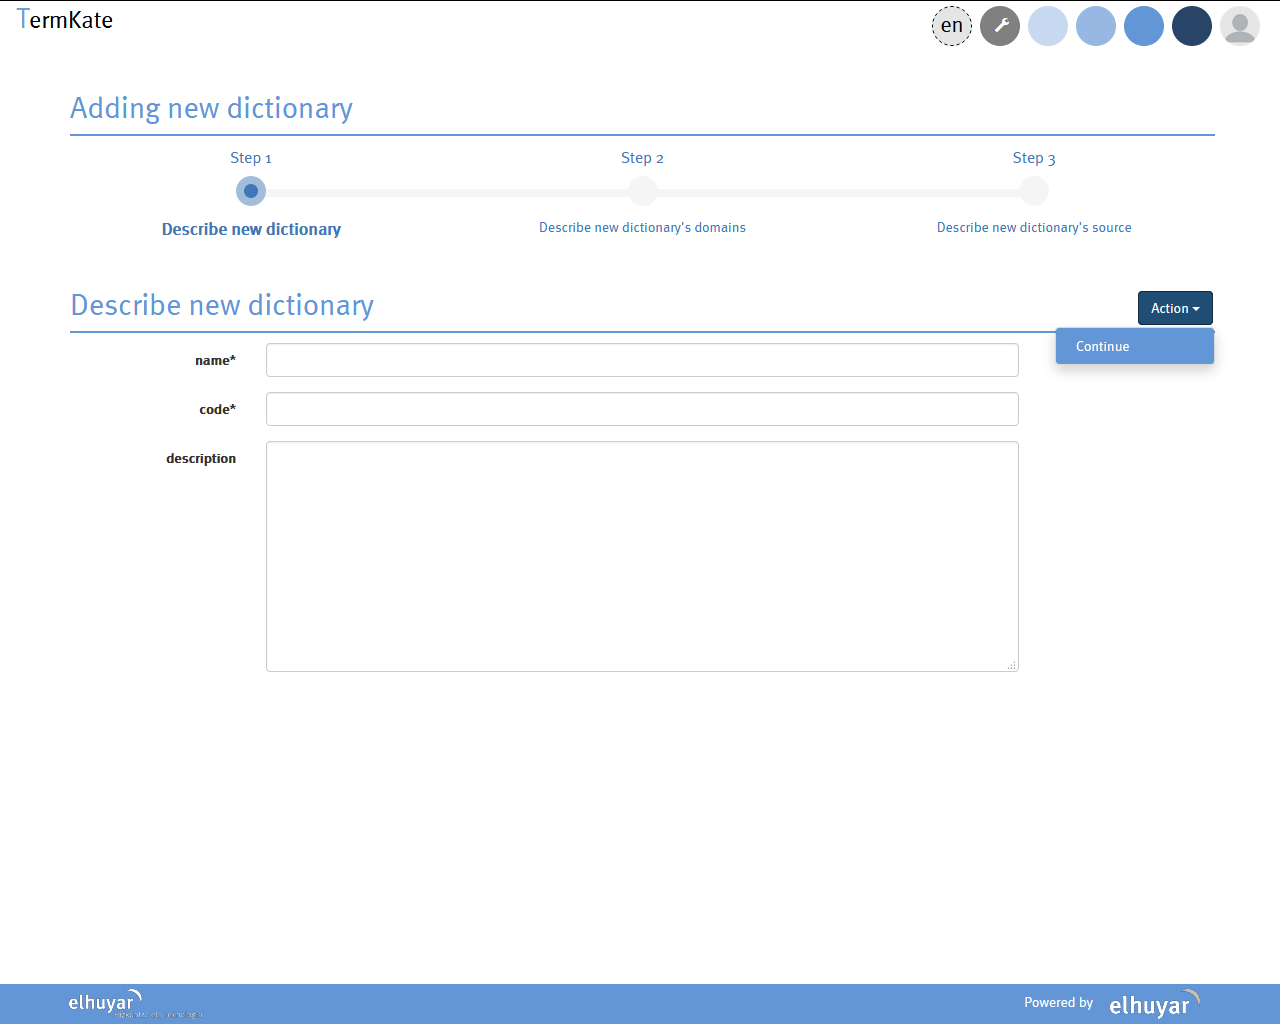
4. HIZTEGIA BERRIA SORTU
Hiztegi berria sortzeko, pantailan ageri diren urratsak jarraitu beharko ditugu.
Lehenengo urratsa: Hiztegia deskribatu.
Hiztegiari izen bat eman behar diogu, sistemak kode bat sortuko du guk jarritako izenaren ondorioz.
Hiztegiari buruzko deskribapen bat egin dezakegu hemen.
'Action' -> 'Continue' botoiari eman

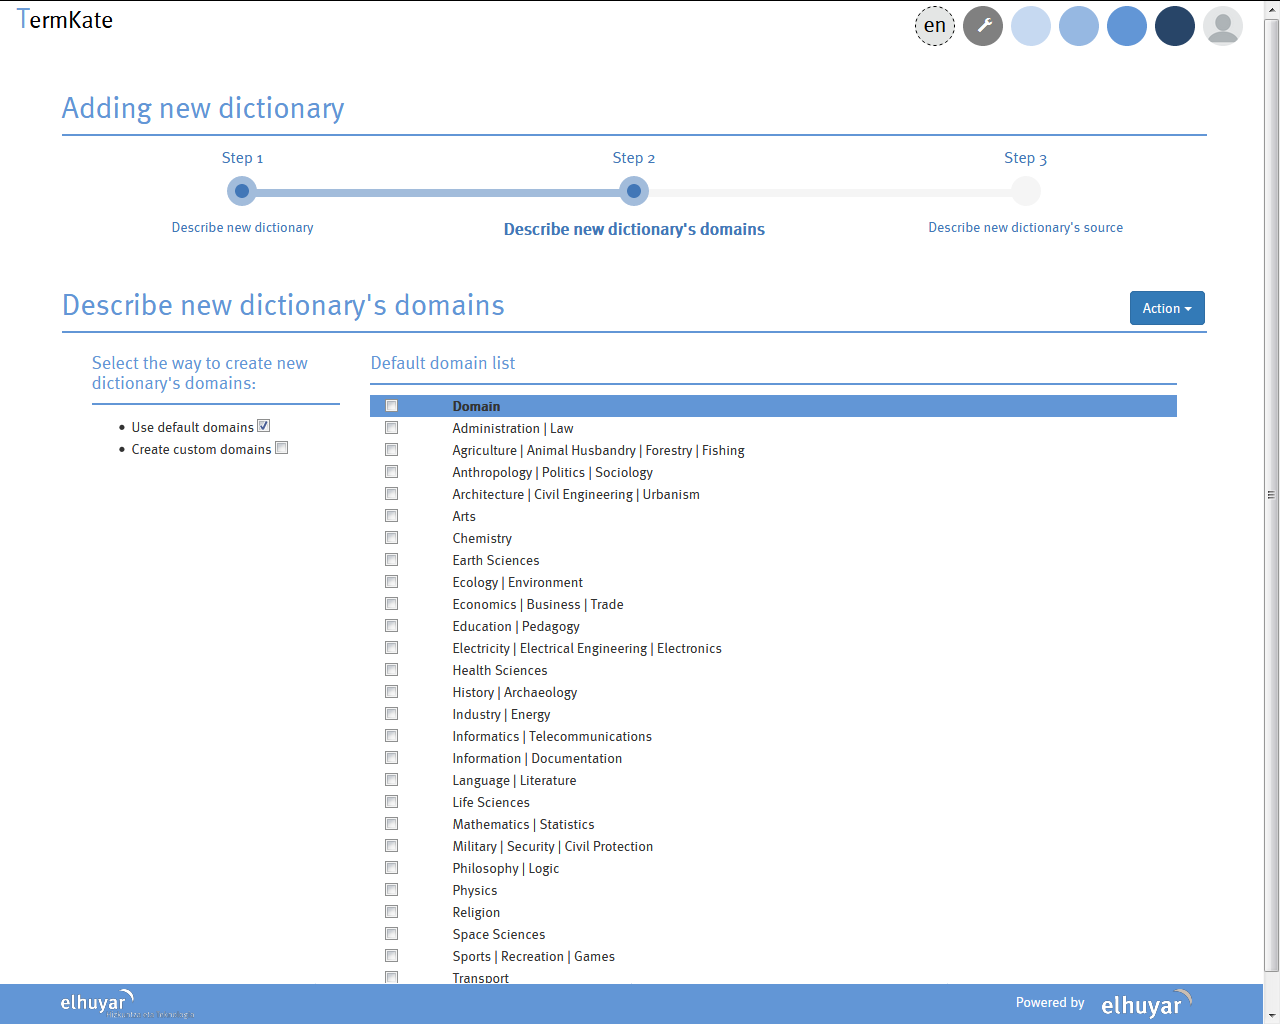
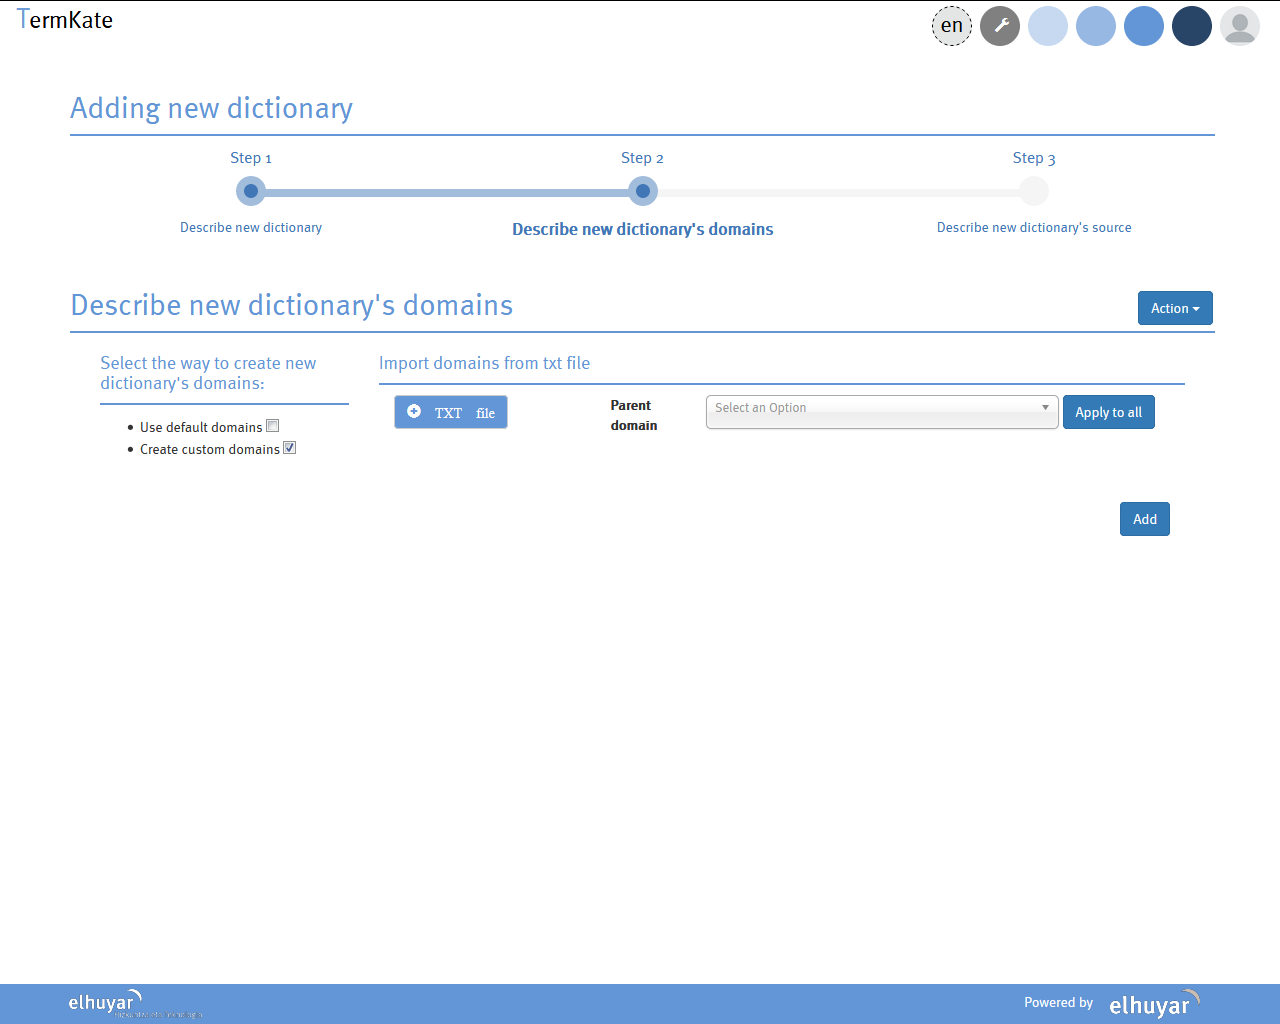
Bigarren urratsa: Hiztegiaren arloak zehaztu.
Urrats honetan, hiztegiko kontzeptuei esleitu nahi dizkiegun arloak aukeratu beharko ditugu. Horretarako bi aukera ematen dizkigu sistemak:
- Defektuzkoen artean egitea aukera: horretarako ematen zaigun arloen zerrendako arloetan ‘klik’ egin behar dugu
- Gure berezko arloak definitzen dituen eremu-zuhaitza eranstea: horretarako arlo-zerrenda bat igo beharko dugu TXT formatuan
- 'Action' -> 'Continue' botoiari eman
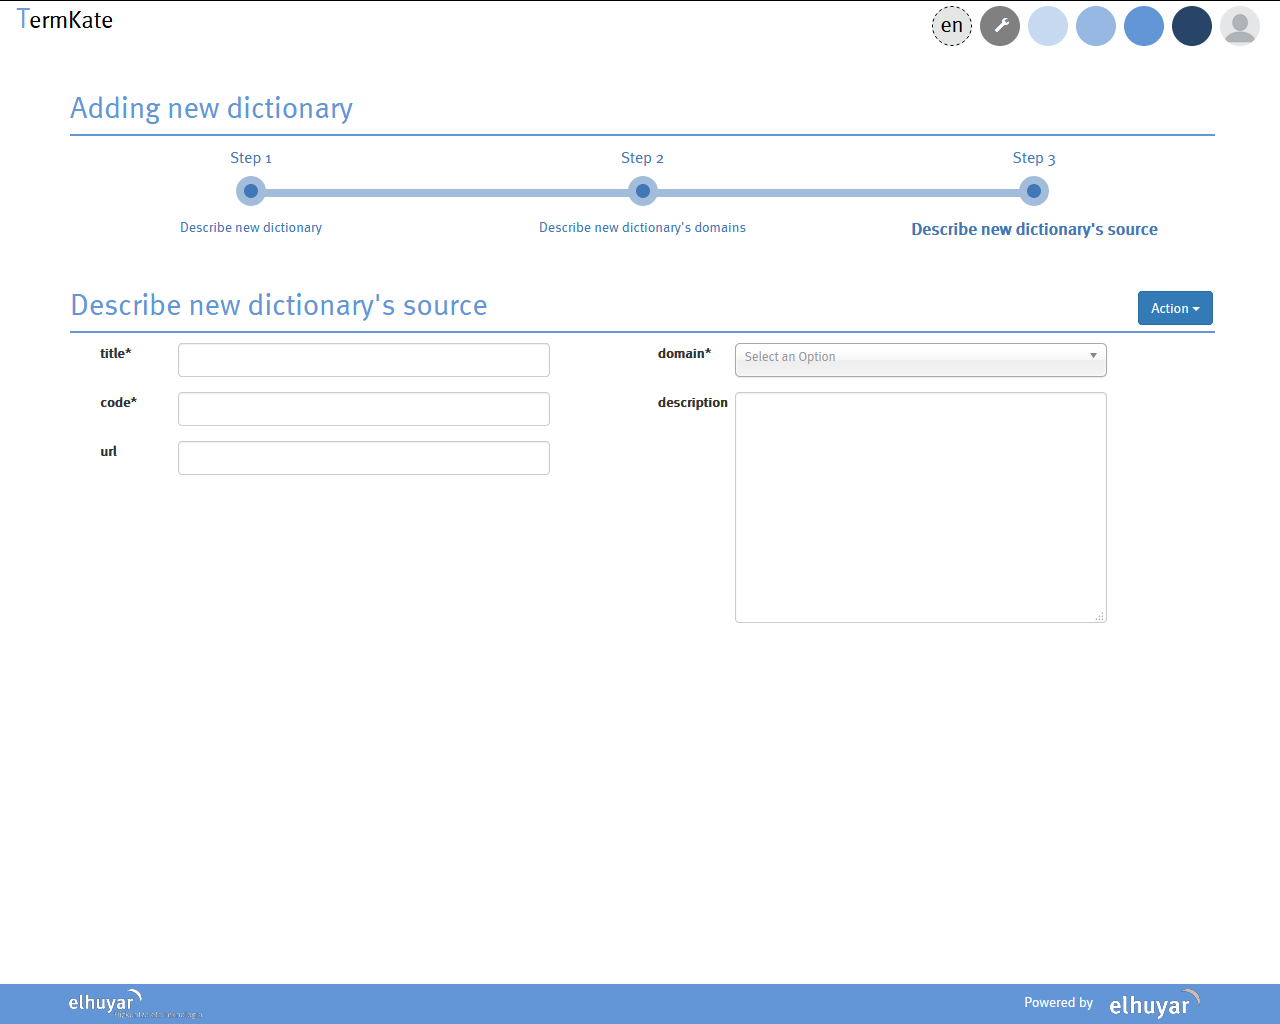
Hirugarren urratsa: Hiztegirako erabili dugu iturria deskribatu.
Urrats honetan, igo dugun itzulpen-memoriari buruzko informazioa eman beharko dugu. Horretarako, izen bat emango diogu eta itzulpen-memoriako edukia deskribatzen duen arlo bat aukeratuko dugu.
'Action' -> 'Create dictionary' botoiari eman
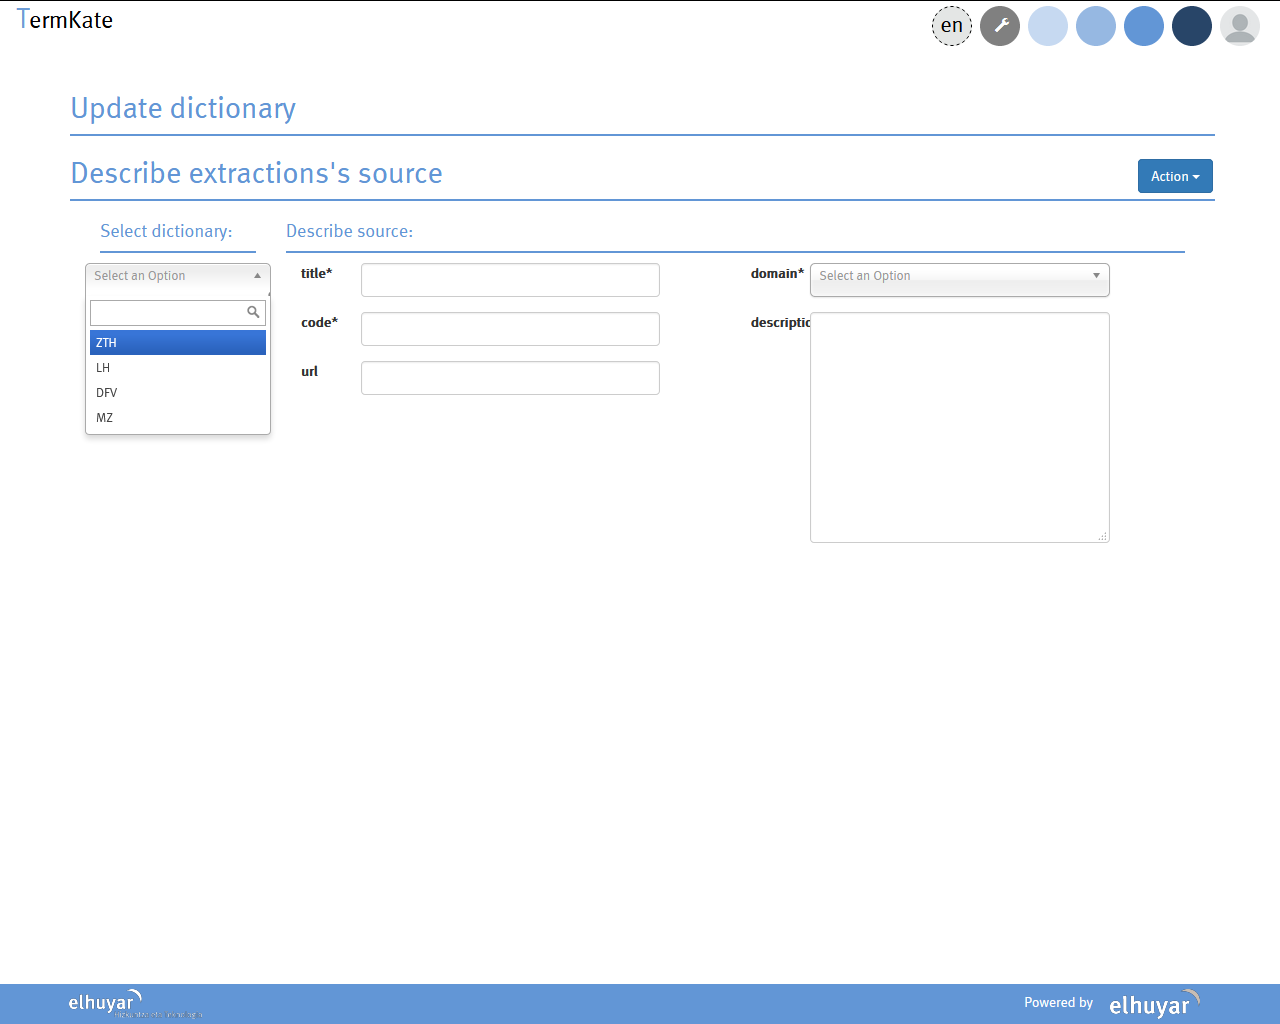
5. AURRETIK SORTUA DAGOEN HIZTEGI BAT EGUNERATU
Termino-bikoteak balidatu ondoren, 'Action' -> 'Update dictionary' botoia sakatu, eta pantailak adierazitako urratsak jarraitu beharko ditugu.
Lehenengo gauza, elikatu nahi dugun hiztegia aukeratzea izango da (Select dictionary).
Ondoren, erabili dugu itzulpen-memoria deskribapena egin beharko dugu: honi izen bat emanez eta arlo bat esleituz.
'Action' -> 'Update dictionary' botoiari eman

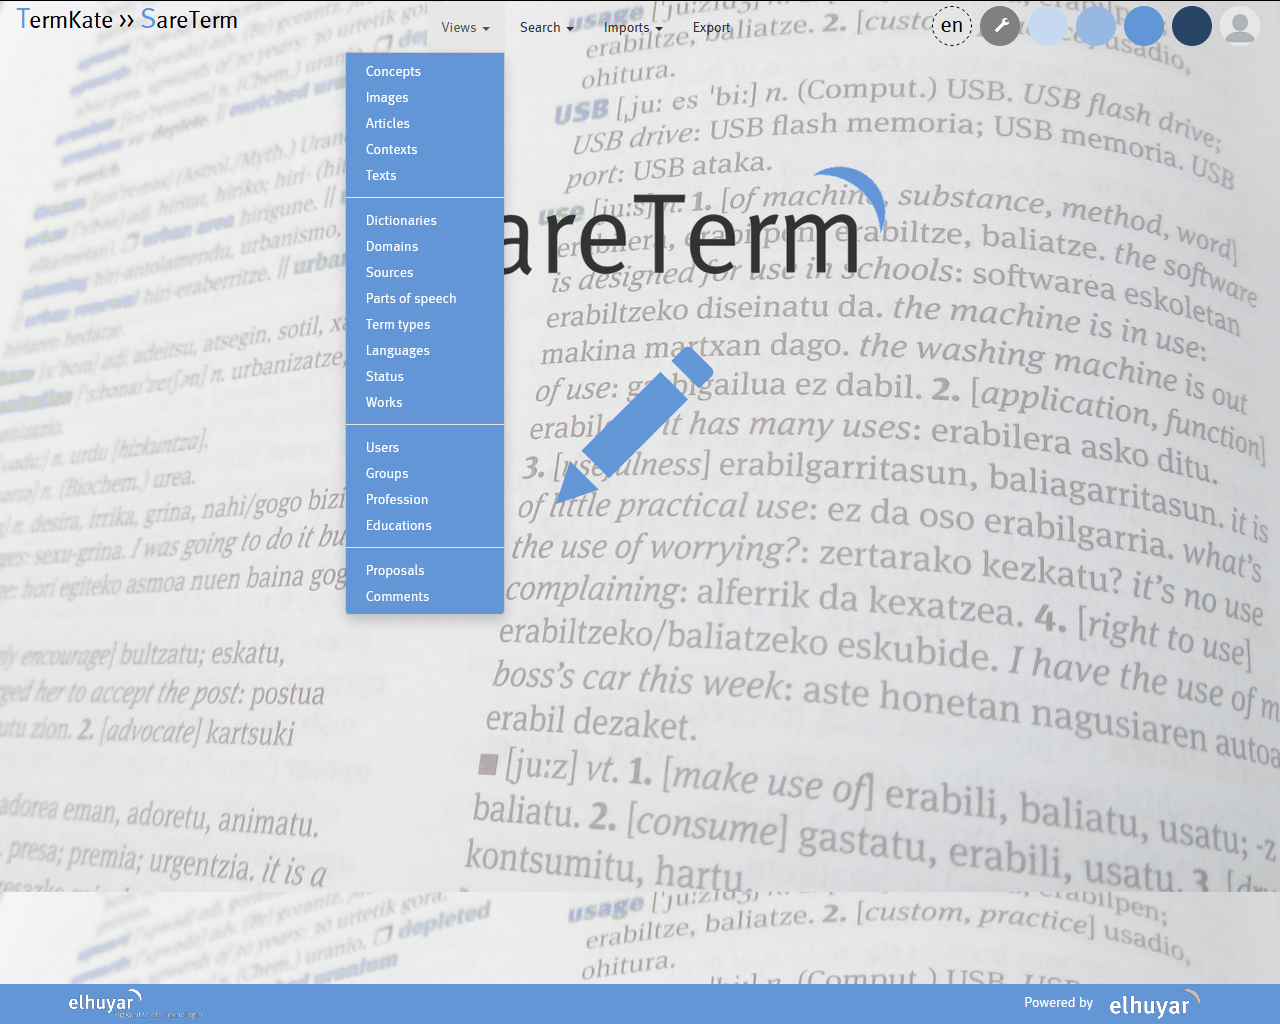
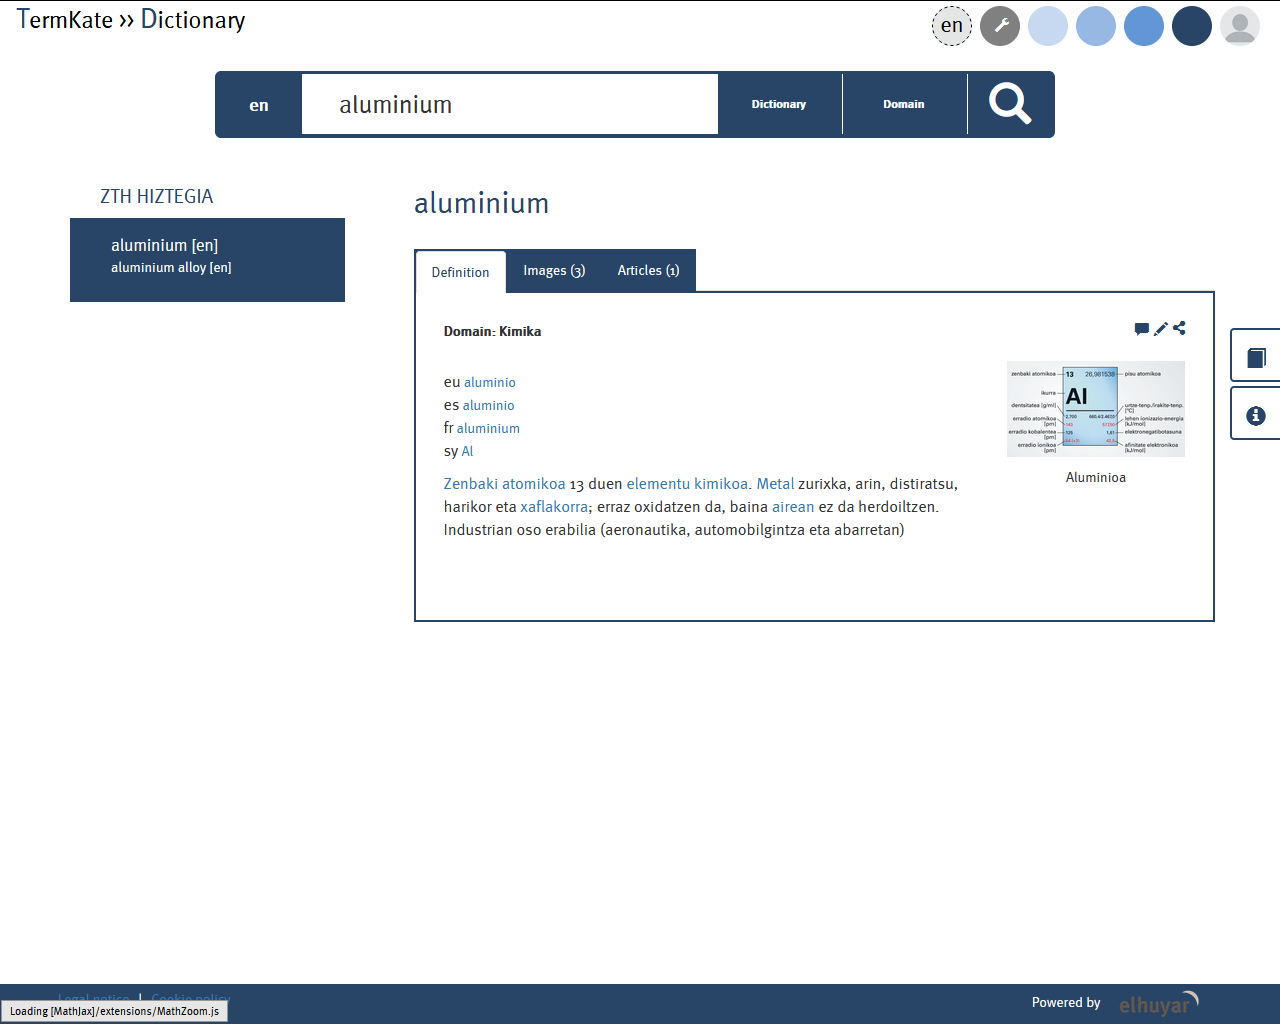
6. DATU-BASE TERMINOLOGIKOA LANDU
Edit/Publish your dictionary
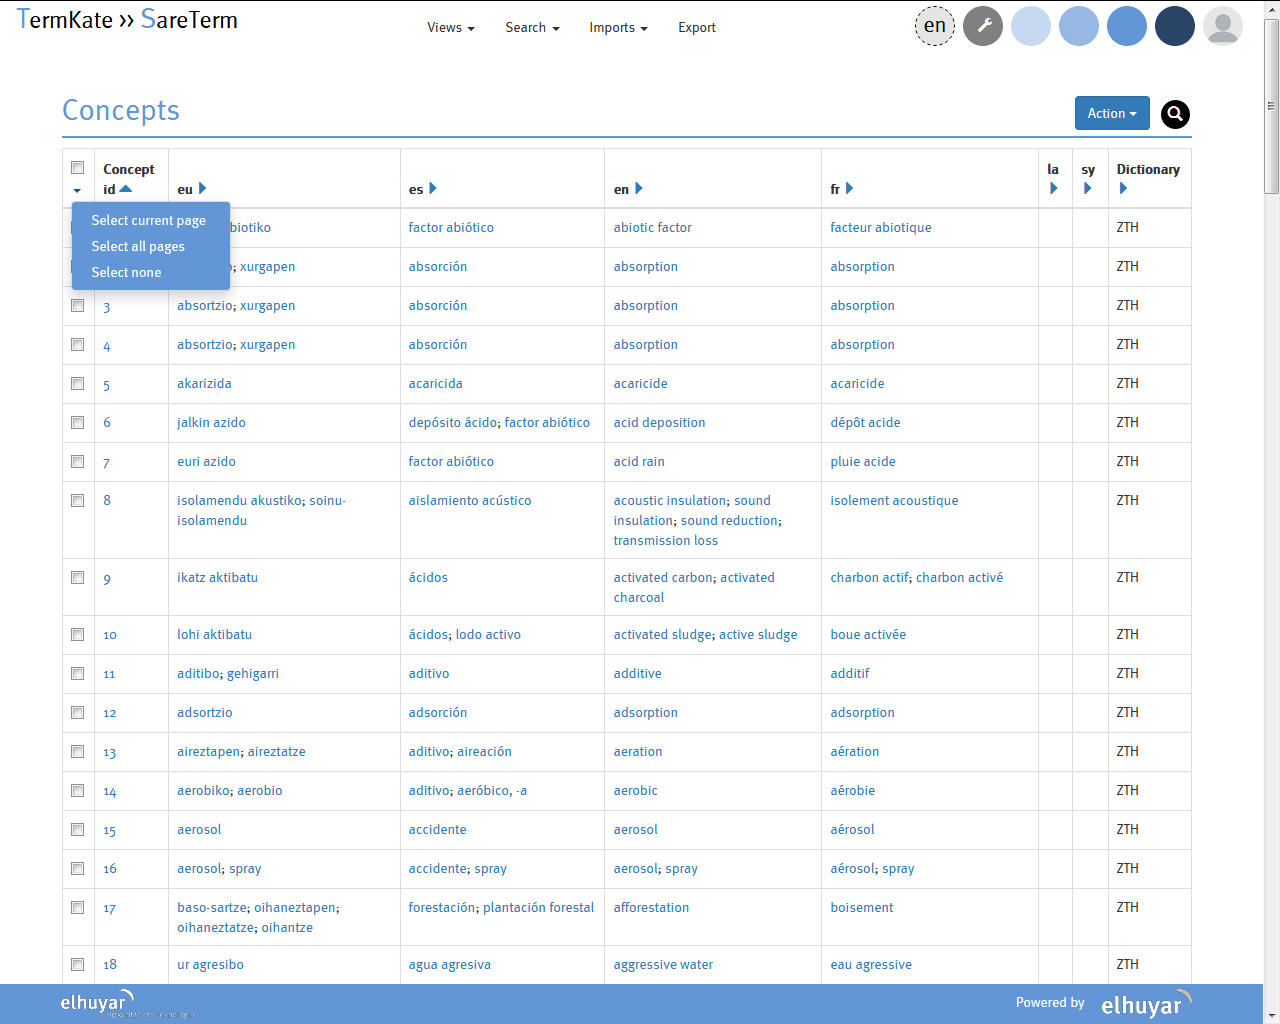
Datu-base terminologikoak, SareTerm du izena.
Bertatik gure hiztegien eduki guztietara atzitzeko aukera izango dugu.
Baina, gainera edukiaz gain hiztegiko informazio guztia kudeatzeko aukera izango dugu.
Horretarako Views atalera joan beharko gara eta bertan zer ikusi edo kudeatu nahi dugun aukeratu: kontzeptuak, irudiak, arloak, testuinguruak, gure hiztegiak, iturriak, zeintzuk diren erabiltzaileak, iristen diren proposamenak eta iruzkinak...
Bertan sakatu eta zerrenda guztiak izango ditugu aurrean kudeatu ahal izateko. Zerrenda hauekin hainbat ekintza egiteko aukera izango dugu.
Bertatik ere, hainbat bilaketa aurreratu egin ahal izango ditugu.
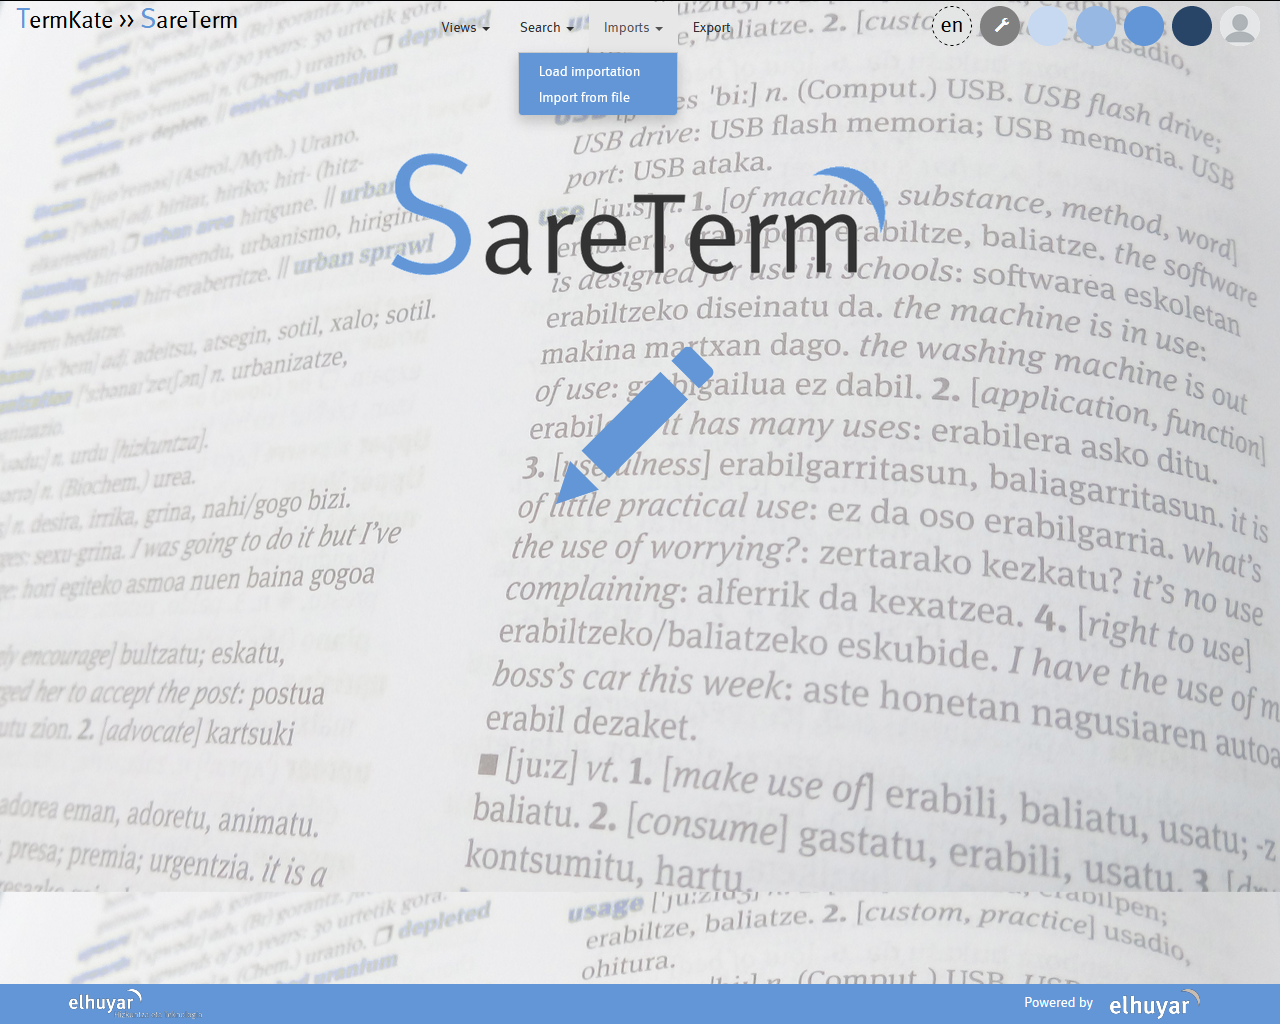
Datu-basean terminologia inportatzeko bi bide izango ditugu:
- 1. Aurretik landu dugun itzulpen-memoria batetik erauzitako terminoak inportatuz
- 2. CSV fitxategi bat inportatuz
Horretarako Imports botoia sakatu eta erabili nahi duzun aukera sakatu:
- 1. Load importation: Itzulpen-memorietatik erauzi dugun terminologia datu-basean lantzeko
- 2. Import from file: zure CSV bat erabiltzeko datu-basea sortzeko
Itzulpen-memorietatik erauzi dugun terminologia datu-basean lantzeko:
'Imports' -> 'Load' importation botoia sakatu
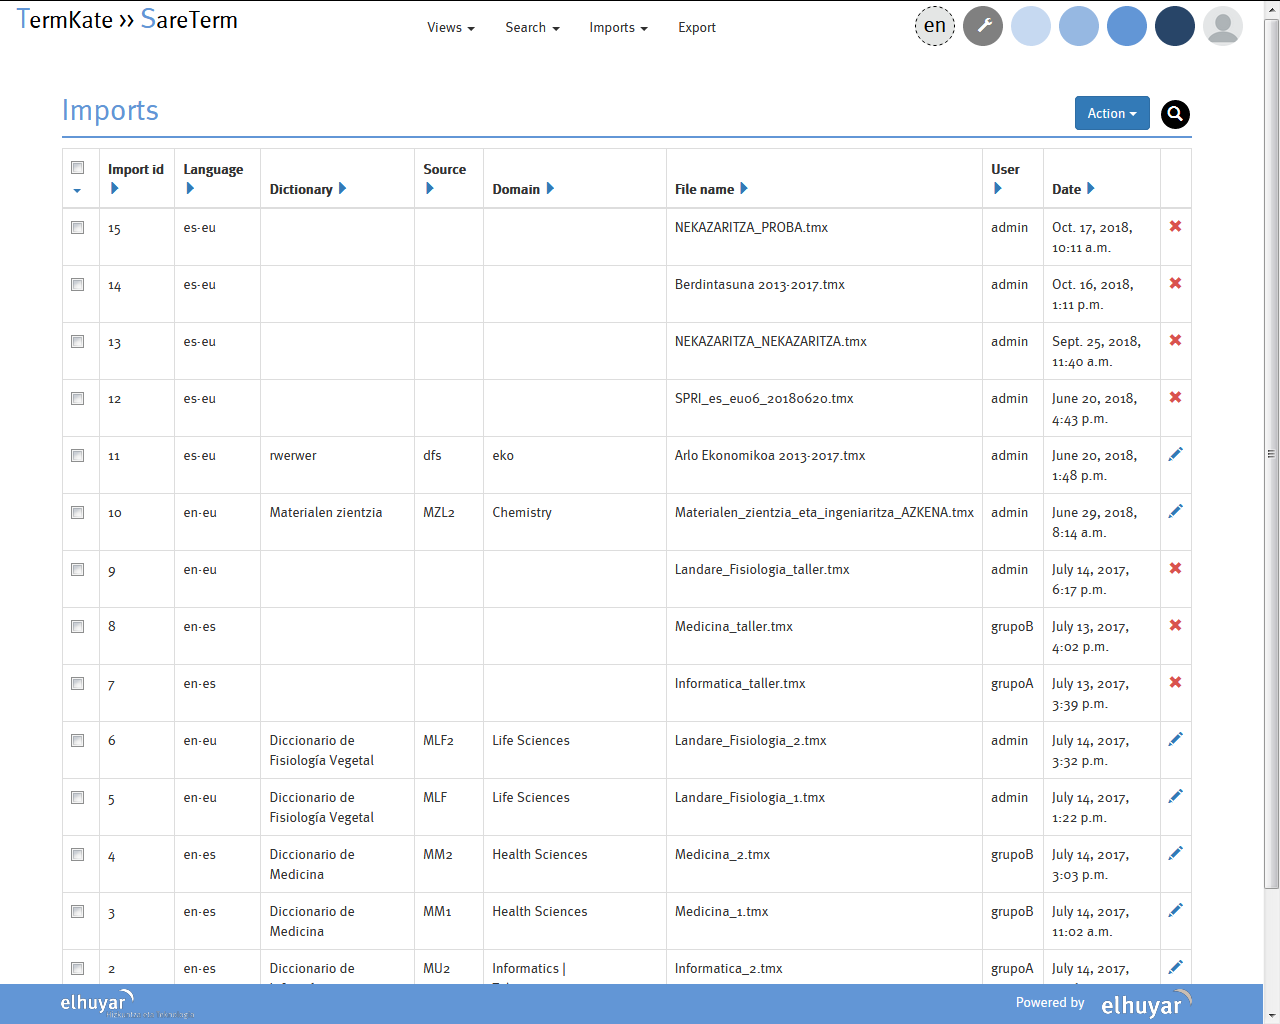
Agertzen den taulatik, nahi dugun inportazioa aukeratuko dugu datu-basea lantzen hasteko.
CSV fitxategi batetik datu-base terminologikoa sortzeko:
'Imports' -> 'Import from file' botoia sakatu

CSV fitxategi bat aukeratu beharko duzu eta bi hizkuntza zutabeak nola banatuak dauden ere aukeratu.
CSV fitxategiak informazio desberdina jaso dezake: hainbat hizkuntza, definizioak, arloak… Baina hori bai, beti zutabeak jasotzen duen informazioaren deskribapena (izenburua) eman behar da.
CSV fitxategia inportatzean, bi ekintza-mota egin daitezke: hiztegi berria sortu edo jada sortua dagoen hiztegi bat eguneratu.
Hautatzen dugun ekintzaren arabera, interfazeak ematen dizkigun urratsak jarraitu beharko ditugu hurrenez hurren. Bi ekintza-mota horiek, laguntzako 4. eta 5. atalean azaldutako urrats berdinak izango dira.
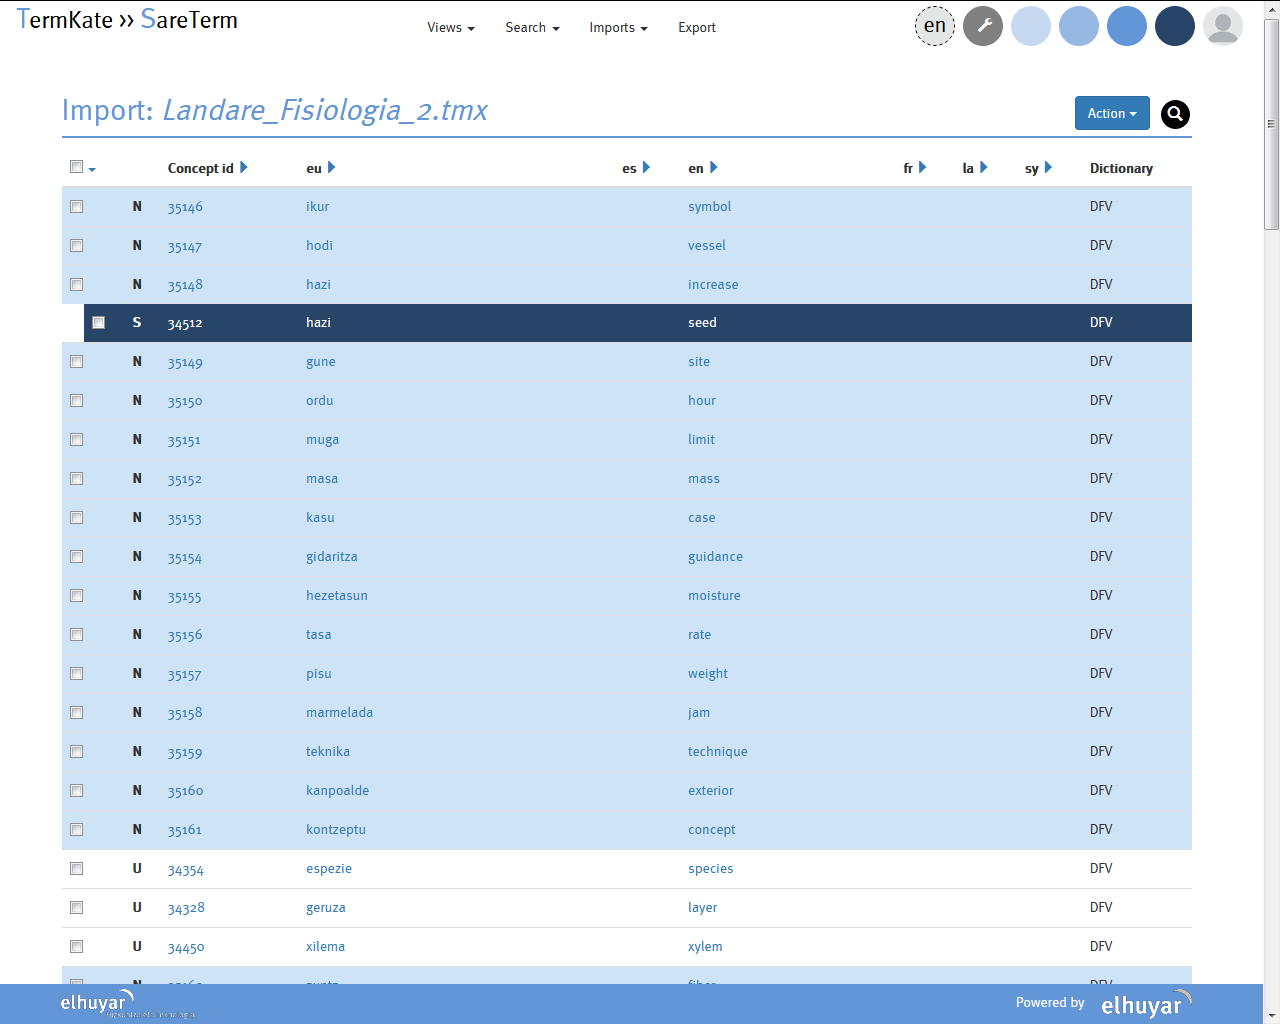
Inportazioa (itzulpen-memoria ala CSV fitxategia) egin ondoren, datu-base terminologikoan hiztegiratu ditugun kontzeptuen zerrenda ikusiko dugu automatikoki.
Zutabeetan kontzeptuei buruzko hainbat informazio dugu:
- Letra bat dugu kontzeptu bakoitzaren lehen zutabean:
- N = kontzeptu berria
- S = sinonimia kasu posiblea
- D = kontzeptu bera aurkitu du (bi hizkuntzetan ordain berdinak), baina alor ezberdinarekin. Sinonimia kasu bat izan daiteke
- U = aurretik dagoen hiztegi bat elikatzerakoan, kontzeptu berari informazio berri bat gehitzen diogunean (testuinguru berriak esaterako)
- Concept id: Kontzeptuaren identifikadorea, automatikoki jartzen den zenbaki bat da
- Euskarazko terminoa (eu)
- Gaztelaniazko terminoa (es)
- Ingeles terminoa (en)
- Frantses terminoak (fr)
- La: latinajoa
- Sy: sinboloa
- Dictionary: kontzeptua zein hiztegitan dagoen esaten digun kodea
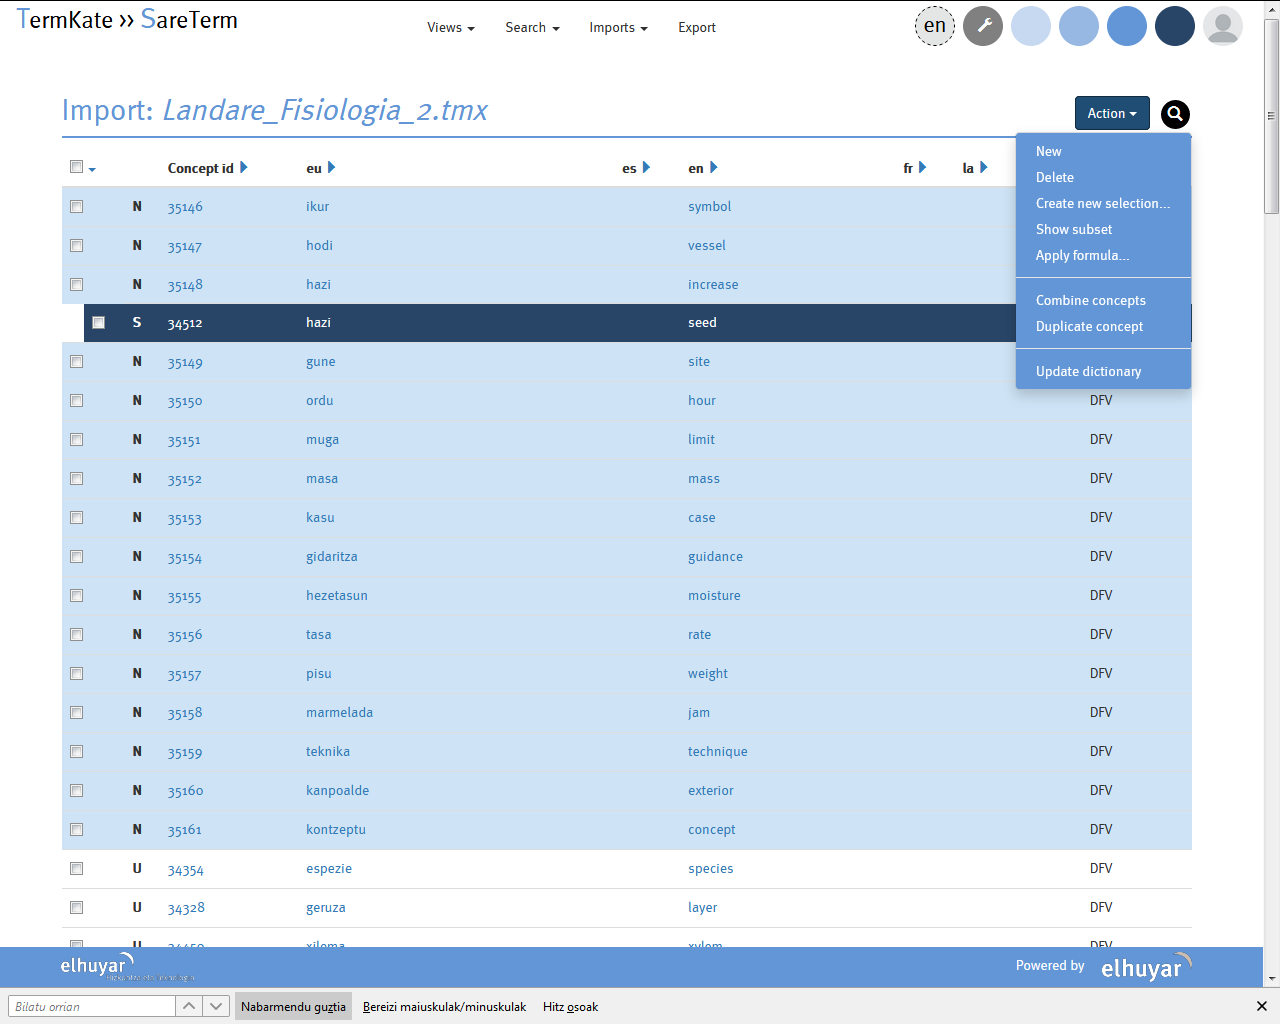
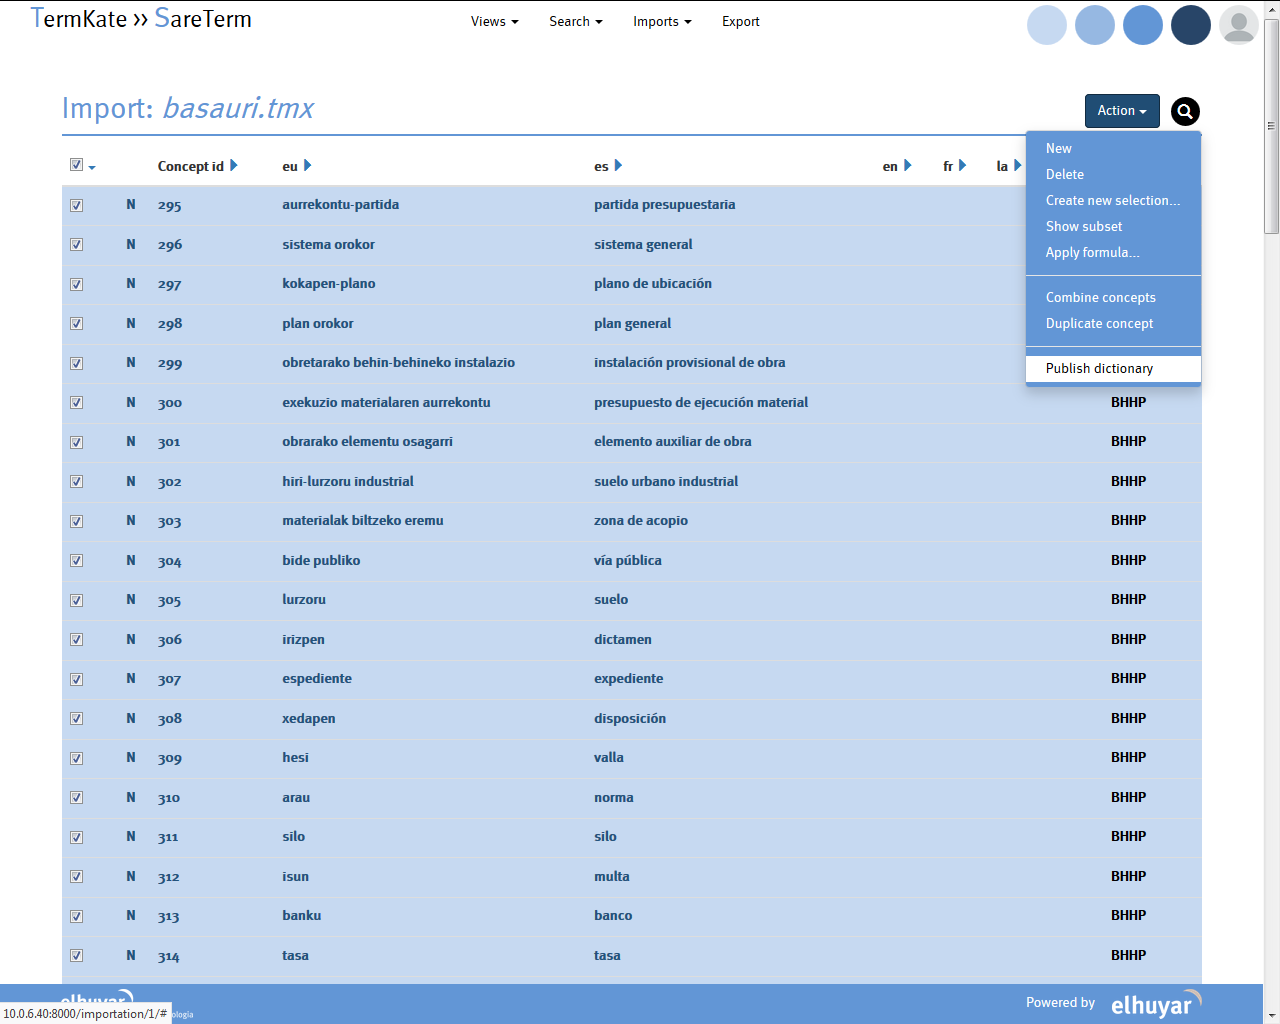
Egin ditzakegun ekintzak:
- Kontzeptu berria sortu (New)
- Existitzen den kontzeptu bat ezabatu (Delete)
- Selekzio berri bat sortu (Create new selection): nahi dituzun kontzeptuekin zerrenda berri bat sortu eta gordetzeko aukera dugu, beste lan batzuk egiteko horiekin
- Multzo bat erakutsi (Show subset): nahi dituzun kontzeptuak bakarrik bistaratzea pantailan
- Formula aplikatu (Apply formula): Ekintza bateratuak egiteko kontzeptuetan
- Kontzeptuak konbinatu (Combine concepts): sinonimia kasuetan kontzeptuak bateratzeko
- Kontzeptuak bikoiztu (Duplicate concept): kontzeptu batetik beste kontzeptu berdin bat kopiatzeko
- Hiztegia publikatu (Update dictionary): hautatutako kontzeptuak zuzenean kontsulta-aplikazioan publikatzeko
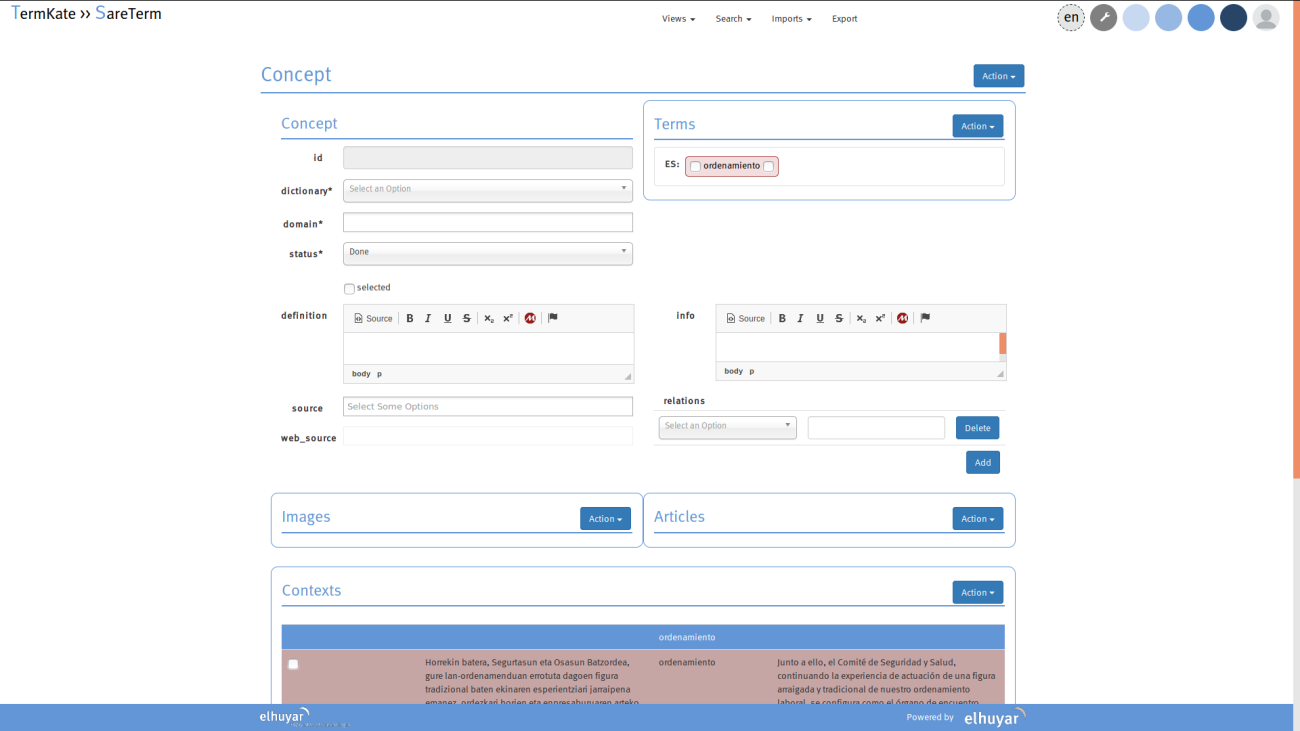
Kontzeptu-fitxaren deskribapena:
Hiztegi hau terminologikoa da eta, beraz, kontzeptua da oinarri-unitatea. Kontzeptu baten informazio guztia fitxa terminologiko batean irudikatzen da: arloa(k), kontzeptu hori adierazteko erabiltzen diren terminoak, testuinguruak, definizioak, artikuluak eta irudiak.
Termino batek, arloaren arabera, kontzeptu desberdinak adieraz ditzake (polisemia). Terminoak arloka antolatzen dira hiztegian. Halaber, bi terminok familia bateko kontzeptu bera adieraz dezakete (sinonimia). Hiztegi honetan, termino sinonimoak kontzeptu-fitxa bakarrean gordetzen dira; termino polisemikoen adierak, berriz, kontzeptu-fitxa banatan./
Hau da kontzeptu bakoitzak izan dezakeen informazioa:
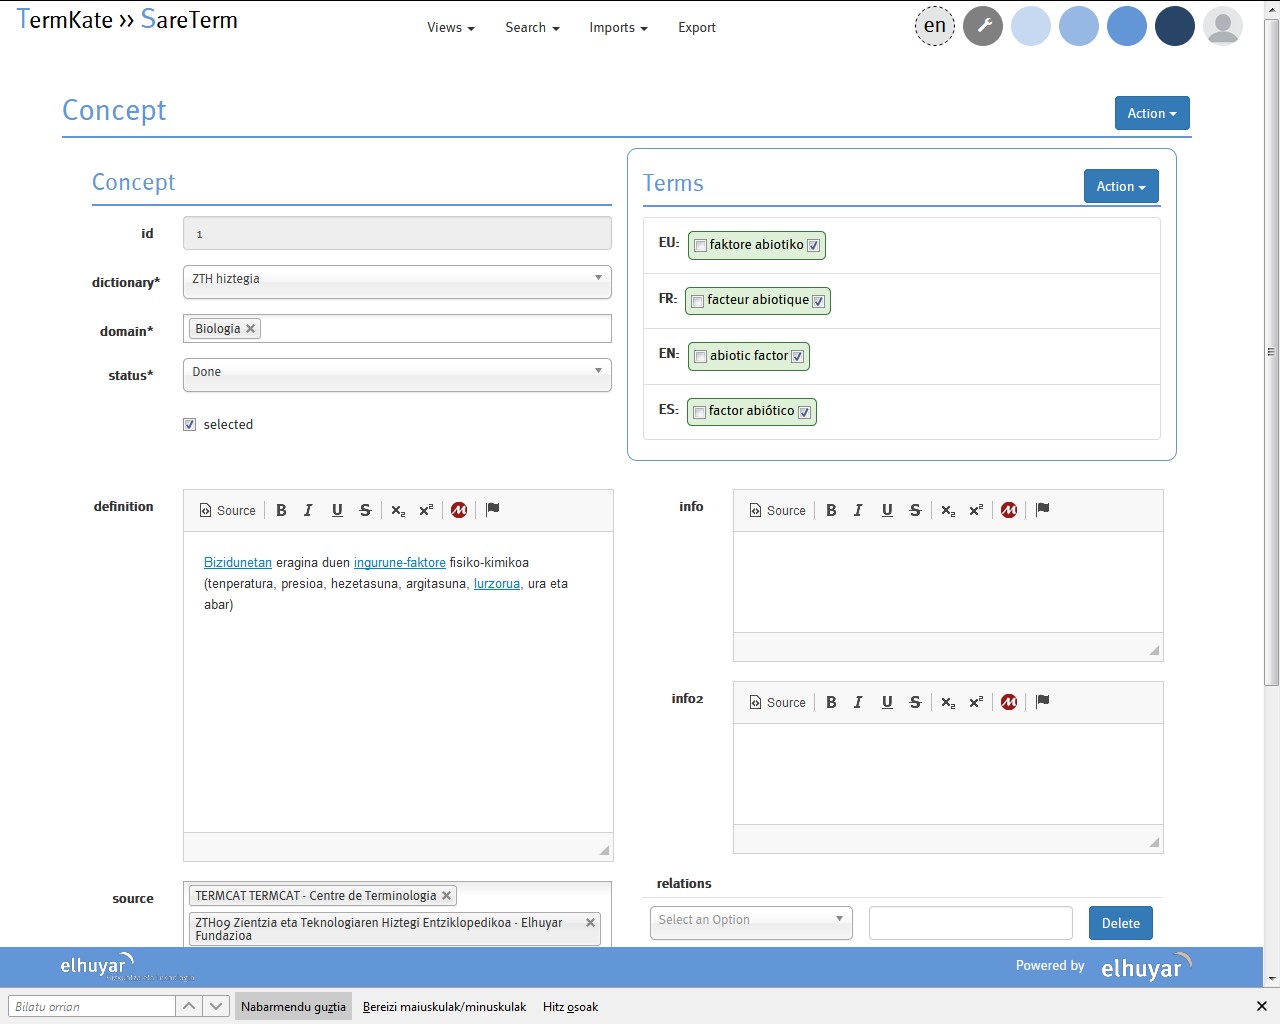
- Id.Kontzeptuari automatikoki ematen zaion kode bat. Hau ezin da editatu.
- Hiztegia: Kontzeptua zein hiztegiri dagokion. Hau ezin da editatu.
- Arloa: Kontzeptuari dagokion arloa. Kontzeptu batek arlo bat baino gehiago izan ditzake loturik.
- Egoera: kontzeptua aurkitzen den egoera (egina edo lanean).
- Terminoak. Bi hizkuntzatako terminoak argitaratzen dira: euskara (eu) eta gaztelania (es), baina hizkuntza gehiago sartzeko aukera dago.
- Definizioa: Kontzeptuaren definizioa idazteko.
- Iturria: Definizioaren iturria.
- Erlazioak: Kontzeptua beste kontzeptu batzuekin erlazionatzeko aukera dago (hiperonimoa, hiponimoa, antonimoa). Erlazionatutako terminoa esteka gisa agertuko da aplikazio-kontsultan.
- Informazioa: Kontzeptuari buruzko informazio osagarria jar daiteke.
- Irudiak. Kontzeptuak irudiak izan ditzake.
- Artikuluak: Kontzeptuak artikulua izan dezake.
- Testuinguruak: Terminoei lotutako testuinguru-bikoteak ageri dira, euskaraz eta gaztelaniaz.
Hiztegia editatzean, gogoan izan behar da kontzeptu-fitxa jakin batean egiten dugula lan.
Hurrengo ataletan, azalduko dugu nola editatu kontzeptu-fitxa bat:
- 1. Arloa zehaztu: arlo bat edo batzuk sar ditzakezu. Eremuaren laukian idatzi ahala, sistemak eskainiko dizkizu idatzitakoa duten arloen zerrenda.
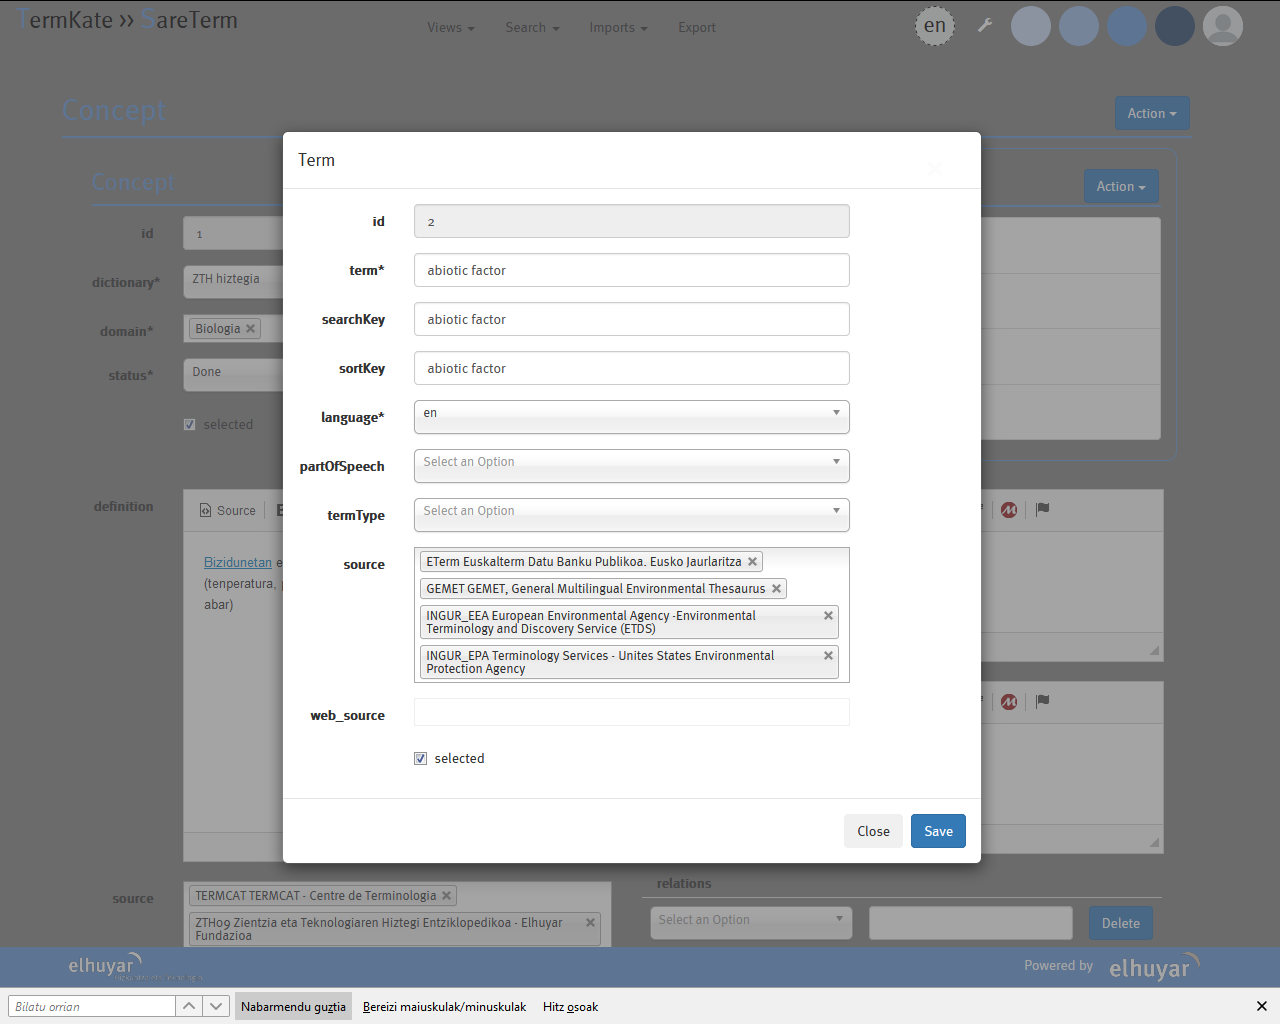
- 2. Terminoa: terminoen forma kanonikoa sartu behar dugu. Hemen, jada sortua dagoen terminoren bat editatu dezakezu, aldatu nahi dugun terminoaren gainean ‘klik’ eginez. Edo termino berri bat sortu dezakezu. Horretarako eskuineko ‘ekintza’ botoian sakatu eta ‘berria sortu’ jartzen duen horretan klikatu behar dugu.
- Terminoa: terminoaren forma kanonikoa.
- Hizkuntza: euskara edo gaztelania. Nazioarteko sinbolo bat aukeratu behar dugu eremu honetan (eu edo es).
- Kategoria: izena, aditza edo adjektiboa.
- Termino-mota: terminoa forma laburra edo luzea den.
- Iturria: terminoaren iturria, nondik atera dugun.
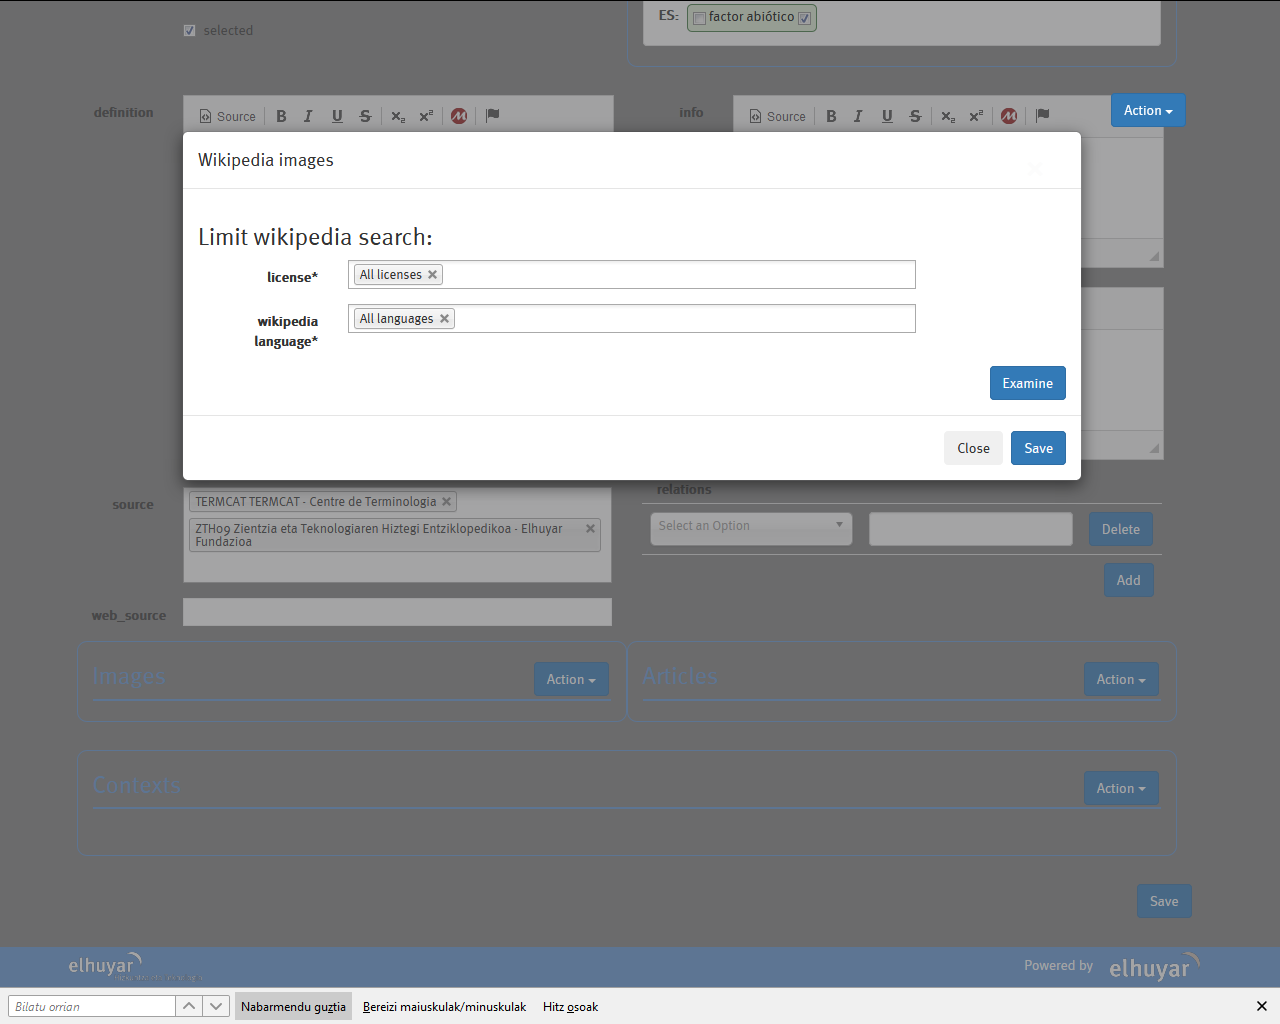
- 3. Irudiak: Kontzeptuaren irudi berri bat gehitzeko aukera dugu. Horretarako bi aukera ditugu, eskuineko ‘ekintza’ botoian sakatu eta ‘berria sortu’ jartzen duen horretan klikatu edo ‘examine Wikipedia’ botoia sakatu.
- Lizentzia-mota: Hiztegian argitaratu ahal izateko, egokiena da irudiak Creative Commons Aitortu-PartekatuBerdin 4.0 Nazioartekoa edo Jabetza publikoa baimen-mota izatea. Beraz, horrelako lizentzia duten irudiak gehitzea gomendatzen da. Erabilera-lizentzia murritzagoa duten irudiak ere igo daitezke, baina, horretarako, irudiaren igotzailearen ardura da irudia hiztegian erabili ahal dela ziurtatzen duen informazioa ematea, hiztegiaren kudeatzaileek egiazta dezaten irudiak baldintzak betetzen dituela. Lizentziaren edo erabilera-lagapenaren informazioa irudiarekin batera argitaratuko da.
- Lizentzia-bertsioa: lizentziaren bertsioa zein den jarri beharko dugu.
- Jatorrizko URL-a: Irudiaren jatorrizko web-helbidea. Wikimedia Commonseko helbidea, edo aitortutako lizentzia egiaztatzeko balio dezakeen web-helbidea.
- Jabea: irudiaren lizentzian ‘Aitortu’ osagaia badago, ezinbestekoa da eremu hau betetzea.
- Deskribapena: irudiaren deskribapena edo bestelako informazio osagarria gehitu dezakezu.
- Oina: hiztegian ikusiko den irudi-oina idatzi beharko dugu.
- 4. Artikulua: Kontzeptuari artikulu bat gehitzeko aukera dugu. Horretarako eskuineko ‘ekintza’ botoian sakatu eta ‘berria sortu’ jartzen duen horretan klikatu behar dugu. Ekintzen artean gauza gehiago ere egin ditzakezu: denak hautatu, denak desautatu, ezabatu, ezabatutakoak berreskuratu…
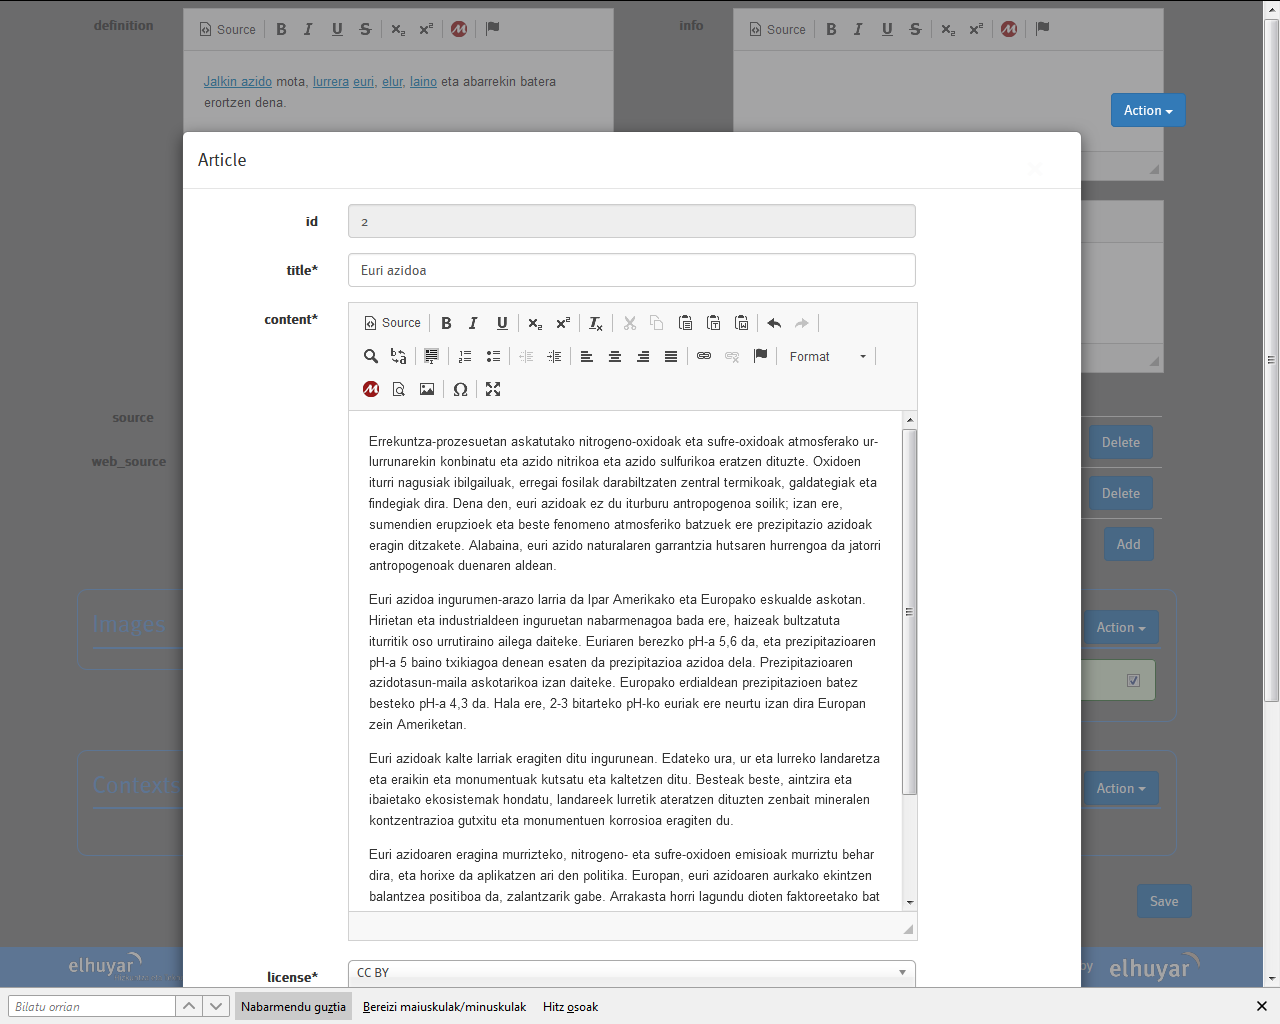
- Izenburua: artikuluaren izenburua
- Edukia: artikulua idazteko lekua da, idazketa errazteko baliabideak eskaintzen zaizkizu goialdean
- Lizentzia: artikulua argitaratzeko behar den lizentzia-mota zehaztu beharko litzateke
- Arloa: artikulua zein arloari dagokion aukeratu
- Egoera: artikulua zein egoeratan dagoen adierazteko (egina ala lanean)
- Egilea: artikuluaren egilea zein den adierazi beharko dugu
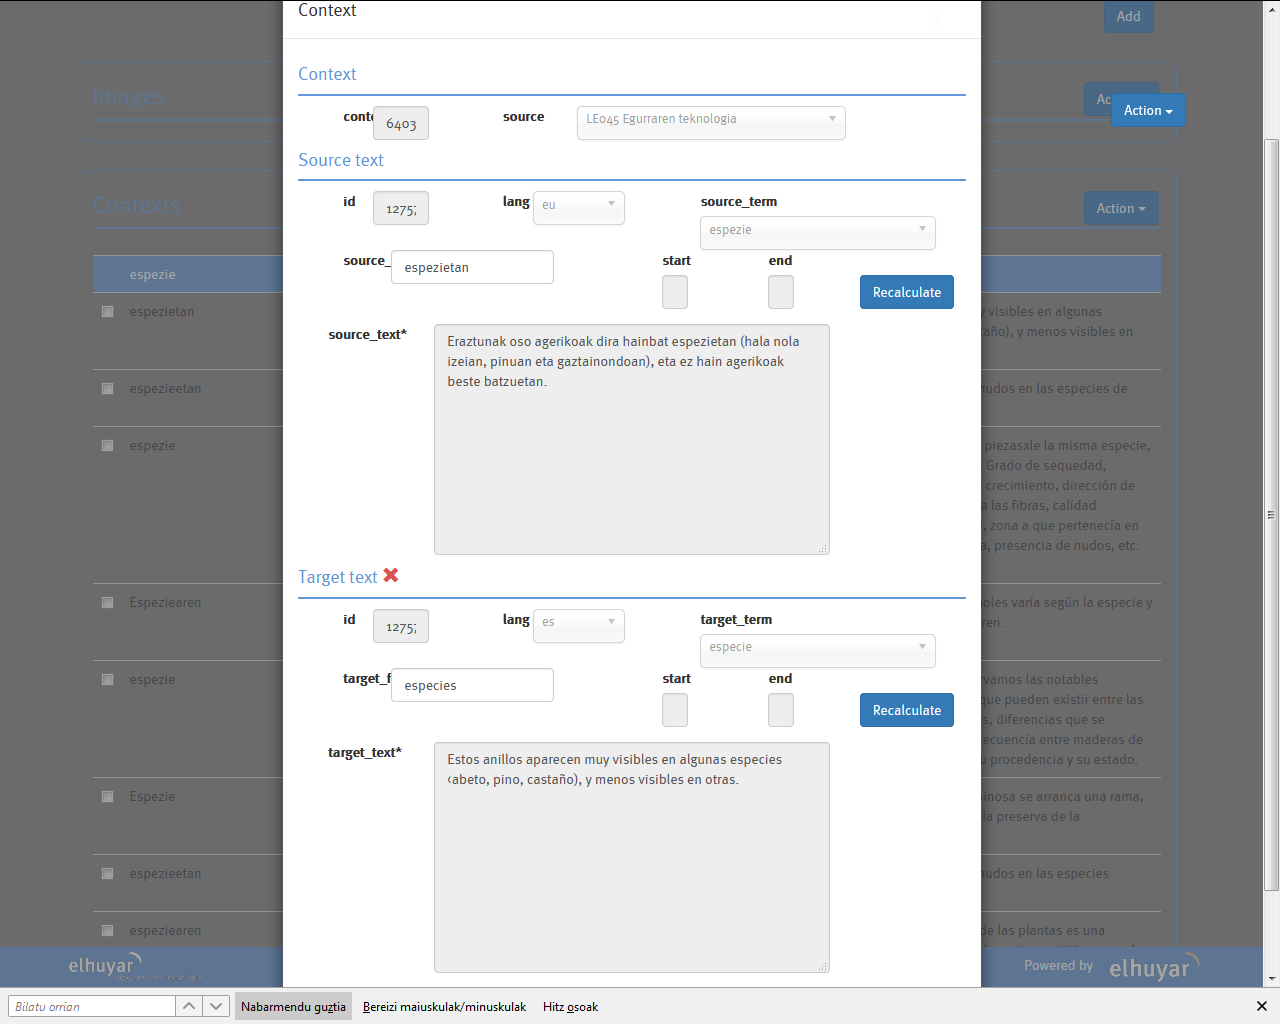
- 5. Testuinguruak: Sortua dagoen testuinguru-bikote batean aldaketak egiteko aukera dugu (testuinguruaren gainean sakatuz) edo testuinguru berri bat gehitzeko aukera. Horretarako eskuineko ‘ekintza’ botoian sakatu eta ‘berria sortu’ jartzen duen horretan klikatu behar dugu.
- Hizkuntza: sartzen dugun testuinguruaren hizkuntza zein den. Nazioarteko sinbolo bat aukeratu behar dugu eremu honetan (eu, es, en, fr…).
- Jatorrizko testua / Helburu-testua (Source text/Target text): terminoa jasotzen duen testuingurua idatzi edo kopiatu behar dugu hemen.
- Jatorrizko forma / Helburu-forma (Source form/Target form): sartu berri dugun testuinguruan kontzeptu-fitxako terminoa zein formatan ageri den idatzi behar dugu. Ondoren ‘posizioa kalkulatu’ botoia sakatu behar dugu.
- Hiztegia publikatu: hiztegi berria sortuko dugu
- Hiztegia elikatu: landu ditugun kontzeptuak dagoeneko existitzen den hiztegi bati gehituko zaizkio
- Informazioa zeuk osatzea horretarako eskuinaldean dagoen arkatzean sakatu behar dugu. Hori eginda, kontsultatzen ari garen kontzeptu-fitxara iritsiko gara zuzenean (SareTermera) eta bertan nahi ditugun aldaketak edo eguneraketak egingo ditugu.
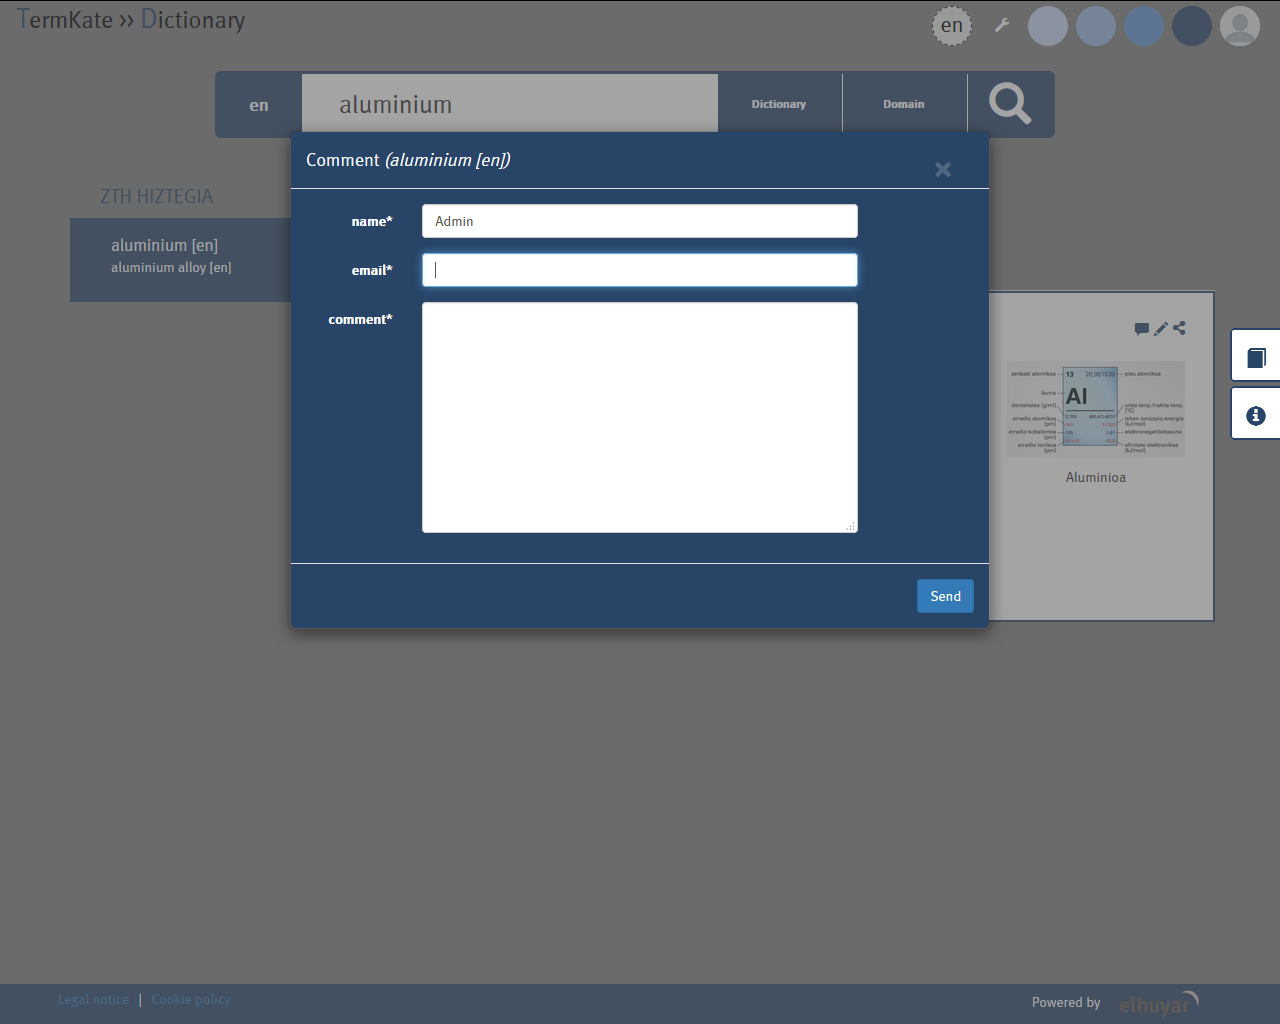
- Iruzkin bat bidaltzea hiztegiko administratzaileari kontzeptu baten inguruko iruzkin bat bidaltzeko aukera izango dugu. Horretarako, ikonoaren gainean klik egingo dugu eta eskatzen zaigun formularioa beteko dugu.
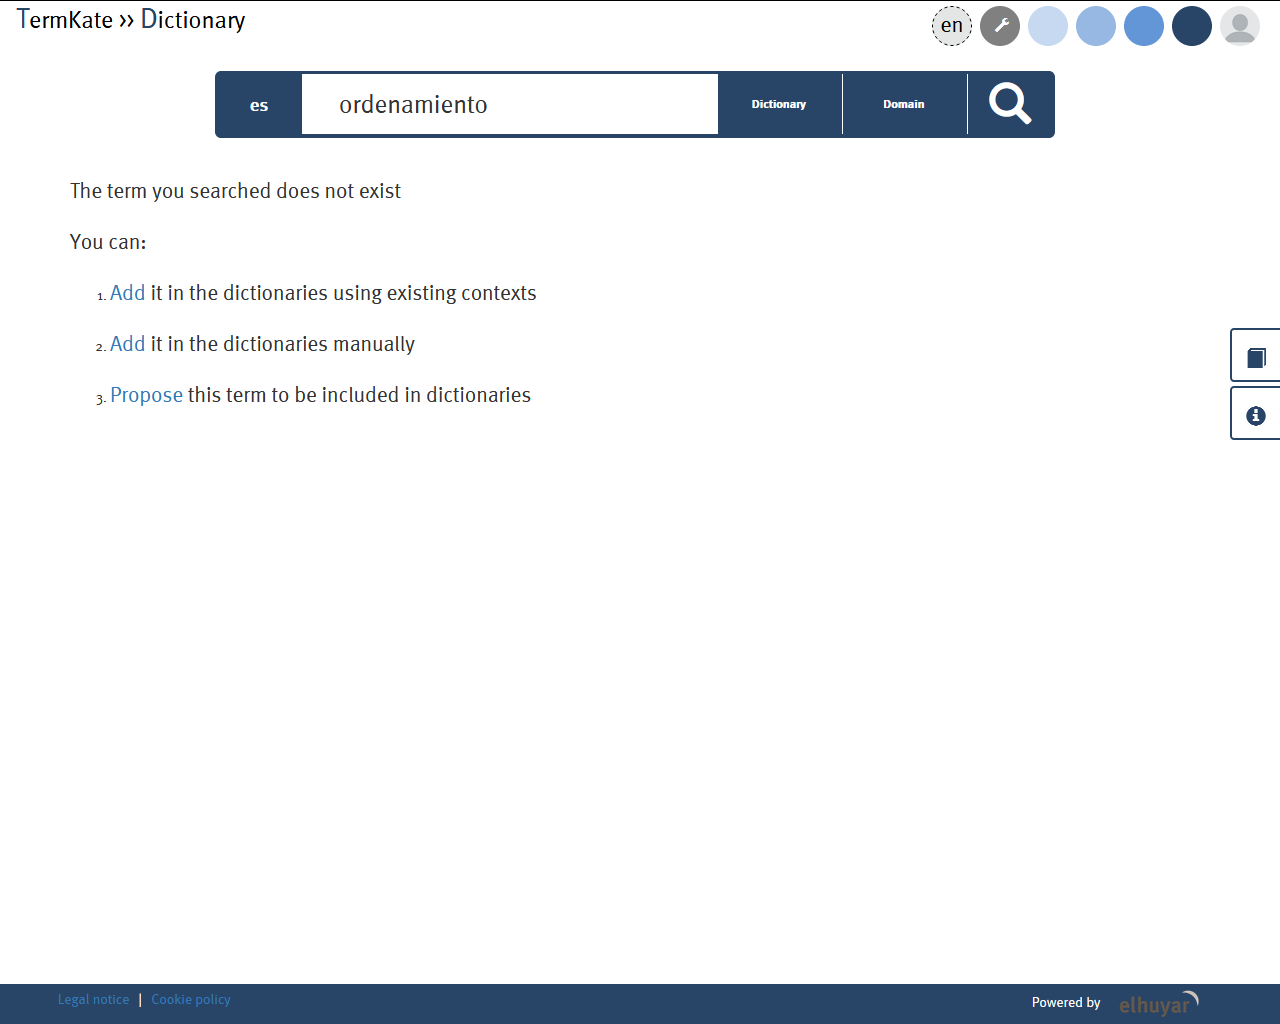
- 1. Hitza gehitu testuinguruak erabiliz aukera sakatuz gero zuk zeuk gehitu dezakezu kontzeptua hiztegian zuzenean SareTermera joanez. Horretarako, sistemak bilatu duzun terminoa zein testuingurutan ageri den erakutsiko dizu eta hortik abiatuta kontzeptu-fitxa bete beharko duzu: eu ordaina bilatu testuinguruetan, eu terminoa sortu, alorra, hiztegia eta bestelako informazioa.
- 2. Hitza gehitu dezakezu hiztegian sakatuz gero Saretermera joango zara zuzenean ere eta zuk zeuk sortu beharko duzu kontzeptu-fitxa. Baina kasu honetan, fitxa guztia hutsik izango duzu eta zuk zeuk osatu beharko duzu dena.
- 3. Proposamena bidali aukera hautatuz gero administratzaileari eskatuko zenioke kontzeptu berria gehitzeko hiztegian. Horretarako eskaintzen zaizun formularioa bete beharko duzu.
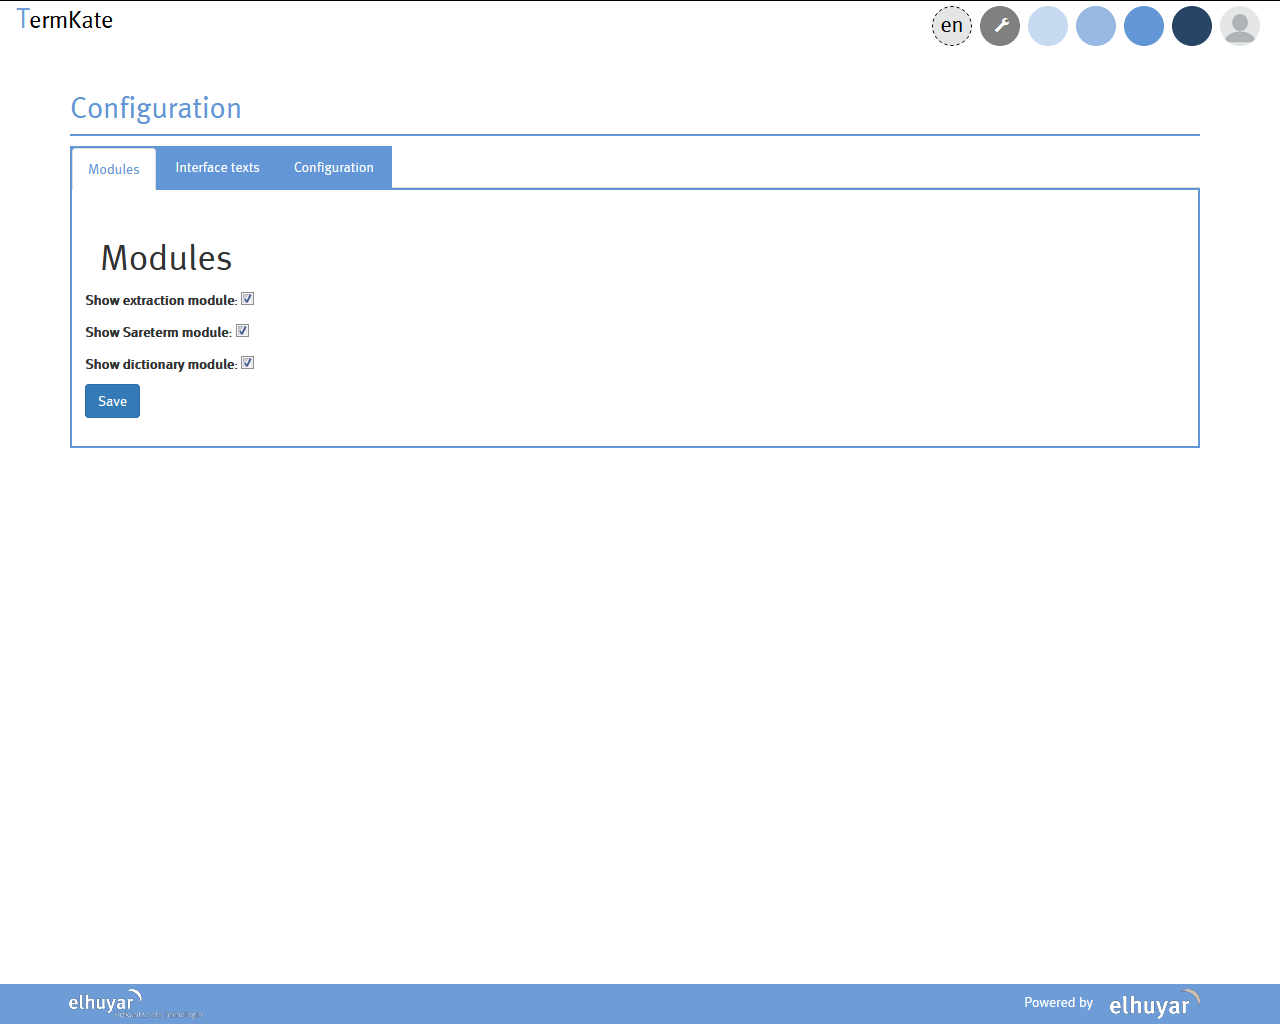
- 1. Moduluak konfiguratzeko: TermKate erremintak eskaintzen dituen kate osoko moduluak behar ez badira, horiek Interfazetik kentzeko aukera eskaintzen zaigu. Horretarako, ikusi nahi ez dugunaren ikonoan klikatu beharko dugu: erauzketa-modulua, SareTerm modulua eta hiztegia kontsultatzeko modulua.
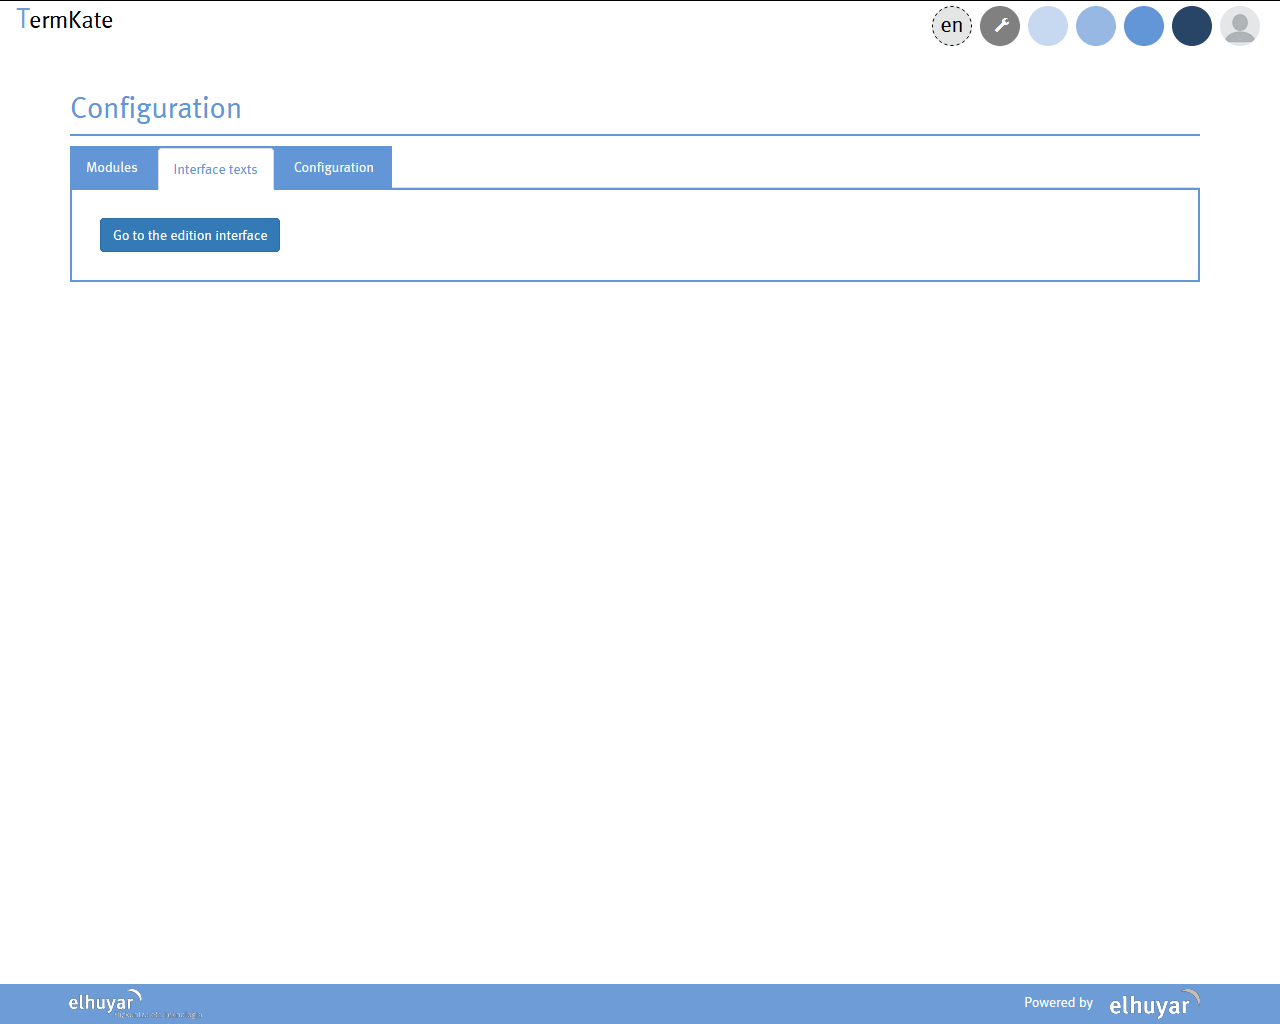
- 2. Interfazearen testuak moldatzeko: hemengo atal honen bidez, erabiltzaileak interfazeko testuak moldatu eta dagokion hizkuntzaren egokitu ahal izango ditu.
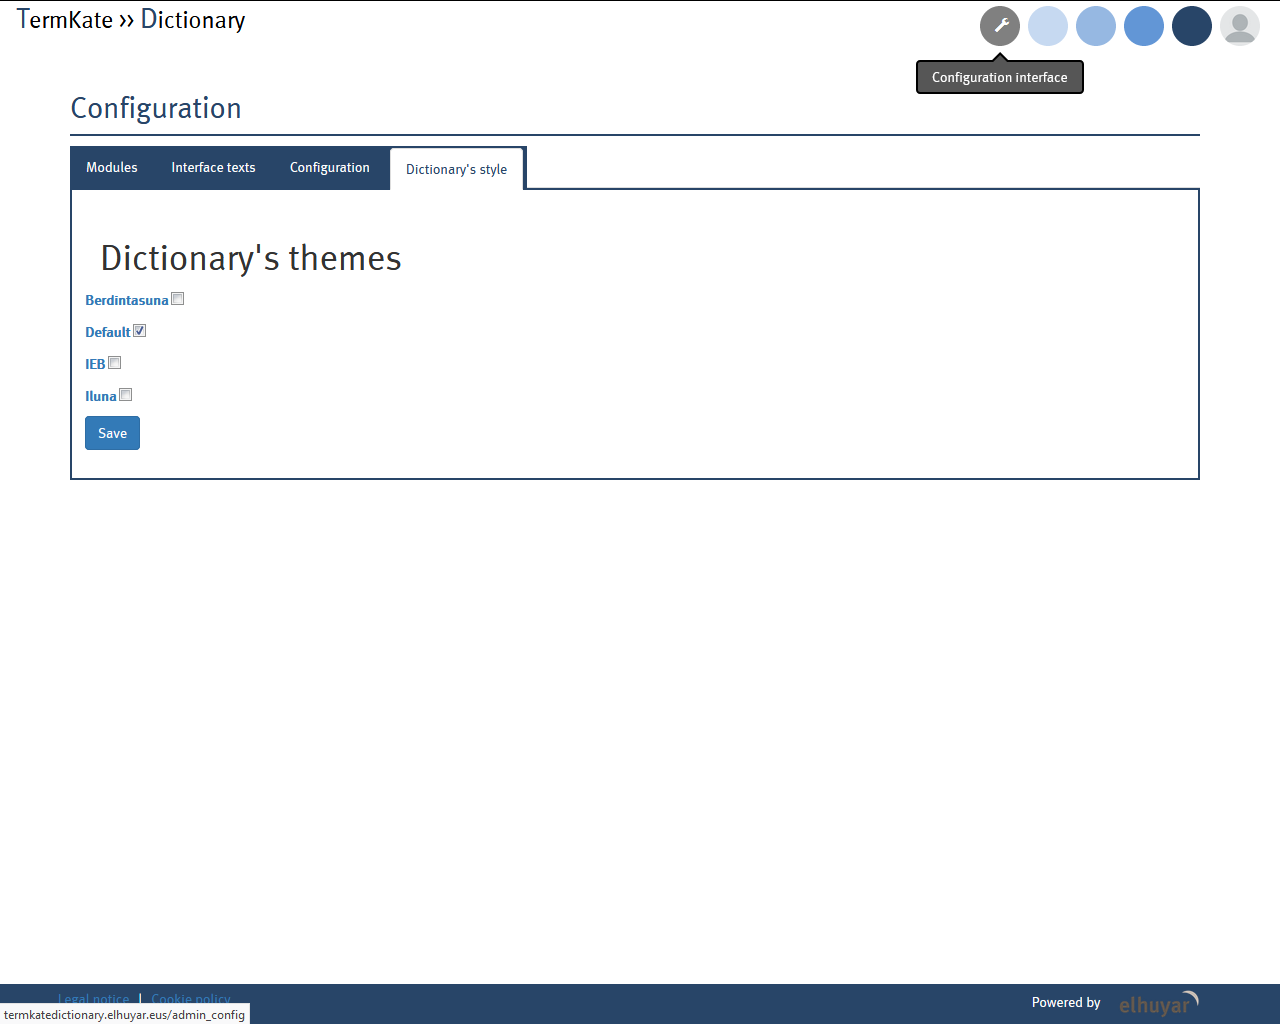
- 3. Hiztegiaren kontsulta-aplikazioren koloreak aldatu: hiztegi-bilatzailean gaudela, giltza ingelesaren gainean klikatuz gero, beste aukera hau agertuko zaigu. Honen bidez, kontsulta-aplikazioren gaia edo estiloa aldatzeko aukera izango dugu.
Ekintzen artean gauza gehiago ere egin ditzakezu: denak hautatu, denak desautatu, ezabatu, ezabatutakoak berreskuratu...
Irekitzen den formularioa bete behar dugu:
Gorde botoiari eman.

Berria denean, gure artxiboetako irudi bat sartuko dugu, beti ere eskatzen diren baldintzak beteaz.
Bestalde, SareTermek aukera ematen digu, zuzenean Wikipediatik irudiak automatikoki ekartzea (beti ere horretarako baldintzak betetzen dituenean).
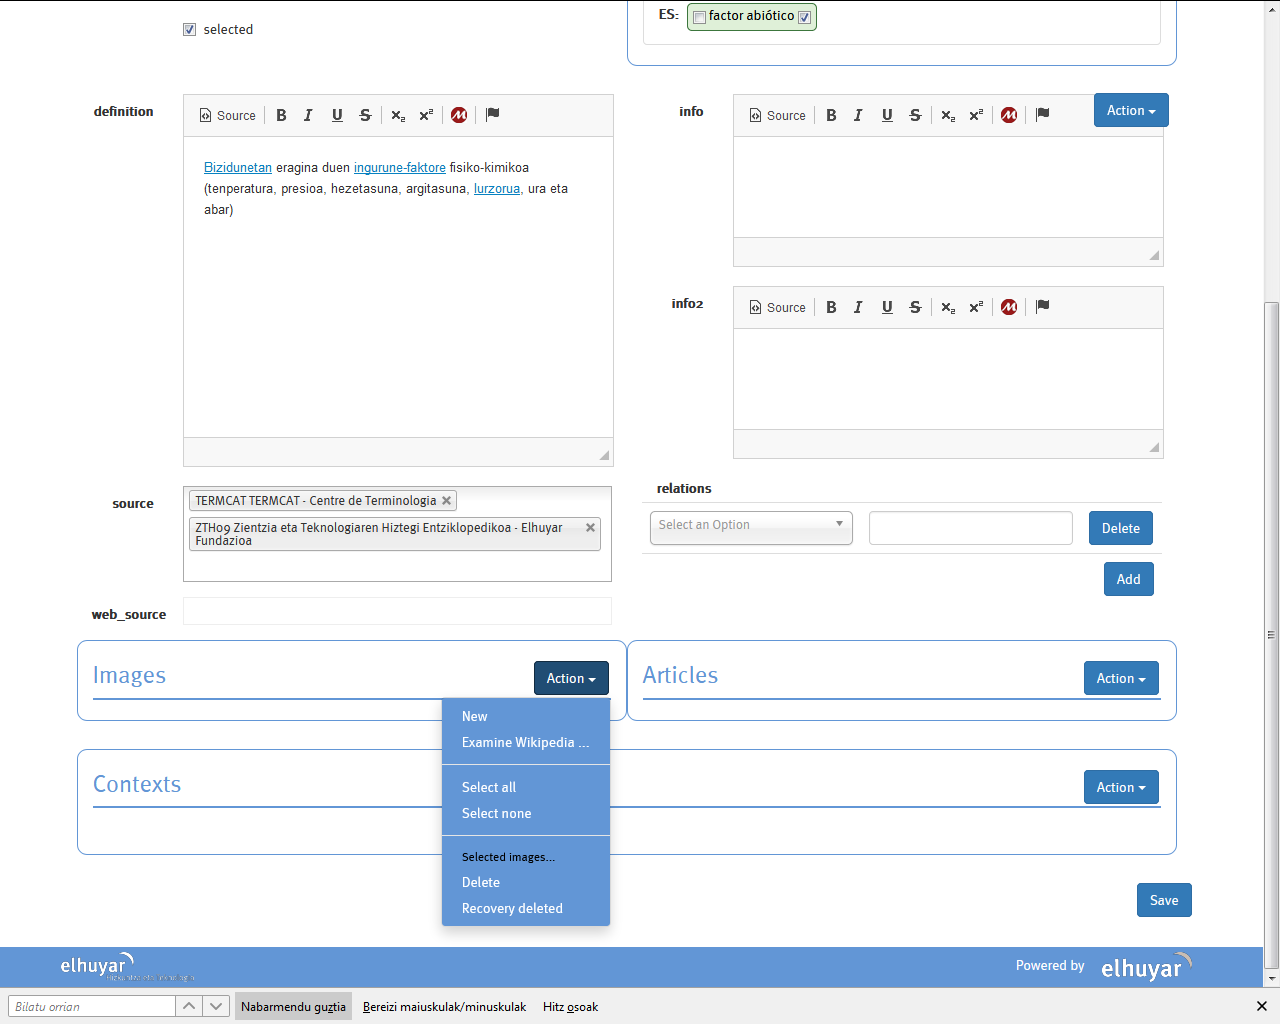
Ekintzen artean gauza gehiago ere egin ditzakezu: denak hautatu, denak desautatu, ezabatu, ezabatutakoak berreskuratu...
Irudia igotzeko, sakatu argazki-makinaren ikonoan, eta nahi dugun fitxategia aukeratu. Ikonoaren azpian, irudiaren datu osagarriak emateko laukiak dituzu.
Artikulua sortzeko, formularioa bete beharko dugu:
Testuinguruak eskuz sartzeko, datu osagarriak emateko laukiak bete beharko dituzu.
Testuinguruetan beste ekintza batzuk egin daitezke ere.
Eman dezagun, termino berri bat gehitzen dugula kontzeptu-fitxan, sinonimo bat.
Kontzeptu-fitxan termino berri bat gehitzen dugunean, sistema automatikoki testuinguruetan sartutako terminoak dituen testuinguruak bilatu eta kontzeptu-fitxan kargatuko ditu. Kontzeptu-fitxan testuinguru horiek gorriz ageri dira eta hauei testuinguru osatugabeak deritze.
Kontzeptu-fitxa osatzeko, dagokion ordaina jarri beharko genuke. Horrela testuingurua, testuinguru osatua izatera pasako litzateke.
Sinonimia kasu hauek nahi haina jarri daitezke.
Kontzeptu-fitxan egiten dugun edozein aldaketa egiteko, goian eskuinean dagoen ekintza botoian sakatu behar dugu eta gorde egin.
Ekintza botoi horretatik ere, kontzeptu-fitxa berri bat sortu dezakegu hutsetik edo dagoen bat ezabatu.
Kontzeptu guztiak landuta daudenean eta hiztegiratzeko prest daudela uste badugu, kontzeptuak hiztegian publikatu behar dira. Horretarako, kontzeptu-fitxa guztiak ikusten diren pantailara joan behar da, denak hautatu (edo hiztegiratu nahi ditugunak soilik, ezkerreko gezian jarrita) eta hiztegia publikatzeko eman. Publikatzeko ekintza botoian sakatu eta egin dugun lanaren arabera:
7. HIZTEGIA KONTSULTATU
Hiztegia publikatu ondoren, Interneten kontsultatzeko aukera egongo da. Horretarako berariazko kontsulta-aplikazio bat diseinatuko da.
Kontsulta-aplikazioan bilaketak, hainbat irizpideren arabera egin daitezke: hizkuntza, arloa eta hiztegia.
Bestalde, bilaketak zuzenean beste hiztegi batzuetan egiteko aukera izango dugu. Horretarako liburutxoaren gainean klik egingo dugu eta bertan nahi dugun hiztegiaren gainean sakatuko dugu.
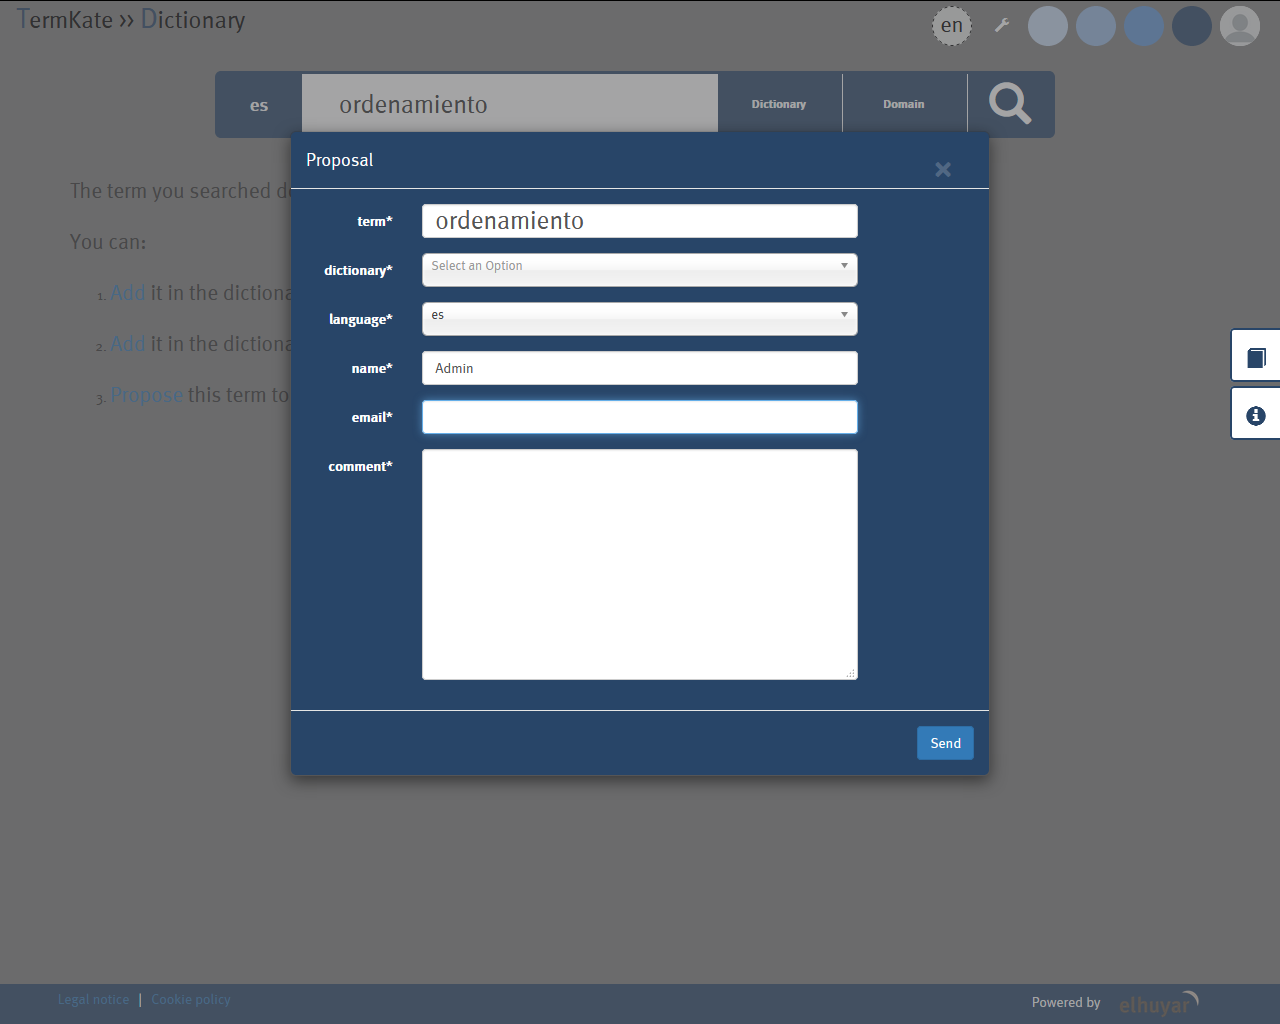
Kontzeptu bateko edukian aldaketa edo zuzenketaren bat egin nahi badugu, sistemak bi aukera ematen dizkigu horiek hiztegiratzeko:
Kontsultatzen dugun terminoa hiztegian ez badago, hori hiztegiratzeko aukera izango dugu. Horretarako, sistemak hainbat aukera eskaintzen dizkigu:
8. HIZTEGIAREN KONFIGURAZIOA
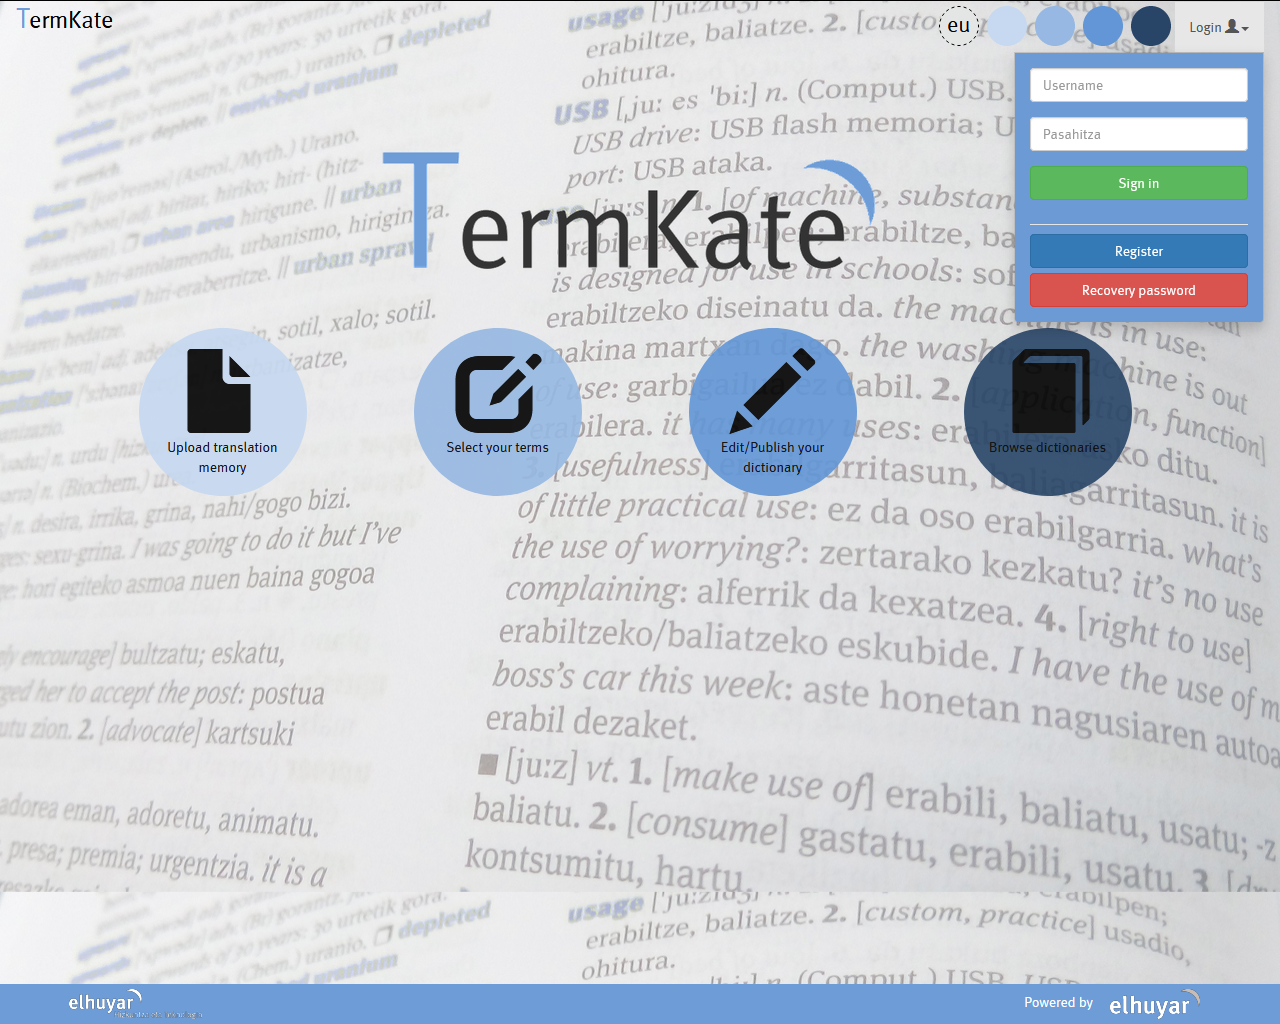
Administratzailea zaren unetik, hiztegiaren konfigurazioaren gainean hainbat aldaketa egiteko aukera izango duzu. Konfigurazio honen helburua da, erabiltzaile bakoitzak TermKate haren beharretara egokitzeko ahalmena izatea.
Horretarako goiko biribiletan, giltza ingelesa duen ikonoa sakatu beharko duzu.
Ikonoa sakatzean, konfiguraziorako aukera ezberdinak irekiko dira:
Erabiltzaileak hiztegiaren erabilera zein izango den arabera egingo du aukera bat ala bestea.